 As digital gaming became more popular, many gamers quickly found themselves being split into console versus PC camps. While there are those who prefer game controllers, one of the key arguments for PC gaming is more control with a keyboard and mouse. Many gamers claim gaming with a keyboard and mouse give you a distinct advantage over those with controllers. Fortunately, there are a number of products which allow you to use a keyboard and mouse with your console and our Kaliber Gaming Keymander review takes a look at one such device.
Before we get to far into the review, there are concerns that using a device like the KeyMander can get you banned from console games. While the jury is still out on that one, here’s an official statement from IOGEAR regarding the use of KeyMander:
Using KeyMander does provide an advantage, but it’s no different than using custom controllers with knobs, paddles, etc. like many of the pros use. Unlike modding devices, KeyMander doesn’t alter the game’s code or create cheat options. Instead, it simply emulates the controller functions so there is no way to distinguish it from a controller.
Specifications
The Kaliber Gaming KeyMander has the following features and specifications:
- Play Xbox One S/Xbox One, Xbox 360, PS4 and PS3 games using a keyboard and mouse instead of the joystick controller for increased speed and accuracy
- Bring the control and accuracy of your Keyboard / Mouse to your game console for the ultimate gaming experience!
- Great for FPS (First Person Shooter), RPG (Role Playing Games), and RTS (Real Time Strategy) games
- KeyMander’s PC Software provides greater levels of configuration and calibration:
- Macros, Deadzones, Mouse Sensitivity and Ballistic Curves, Turbo, and Custom Key Mapping
- Direct Button Mapping using your PS4®, Xbox® One, PS3® or Xbox® 360 controller for quick and accurate in-game customization
- Stores multiple profiles in groups for different games or gamers for customized advantages
- Create groups for different games or users; up to 8 profiles per group
- Hotkeys allow instant profile switching during live gaming
- Connect a laptop while gaming to make adjustments on the fly- KeyMander also works with the laptop’s keyboard if desired
- Plug and Play – Start playing right out of the box using the default settings (although using the KeyMander software for initial setup is highly encouraged)
- Interchange a single KeyMander between multiple game consoles and/or console platforms without changing firmware
- Requirements
- Playstation® 4 Pro/Playstation 4: requires a Sony Playstation brand PS4 wireless controller connected via a micro USB cable (not included)
- Playstation® 3: requires a Sony Playstation brand PS3 wireless controller connected via a mini USB cable (Sony DualShock 3 SIXAXIS controller is recommended, not included)
- Xbox® One S/Xbox One: requires a Microsoft brand Xbox One S / Xbox One wireless controller connected via a micro USB cable (not included)
- Xbox® 360: requires a Microsoft brand Xbox 360 wired controller (not included)
- PC with USB 2.0 port
- USB Keyboard and USB Mouse (Compatible with most wireless keyboard/mouse devices)
- Windows® 10, Windows® 8.1, Windows® 8, Windows® 7, Windows Vista®
- Connectors (Input): USB x3
- Connectors (Console): Mini USB
- Connectors (Computer): Mini USB
What’s in the box
- KeyMander Controller Emulator
- 2x USB A to USB Mini-B Cables
- 3.5mm Data cable (reserved for future use)
- Quick Start Guide
- Warranty Card

Design
Before we begin, I definitely got a chuckle out of the KeyMander part number once I saw it: GE1337P — a fun product Easter egg if I’ve ever seen one. Now on to the review…
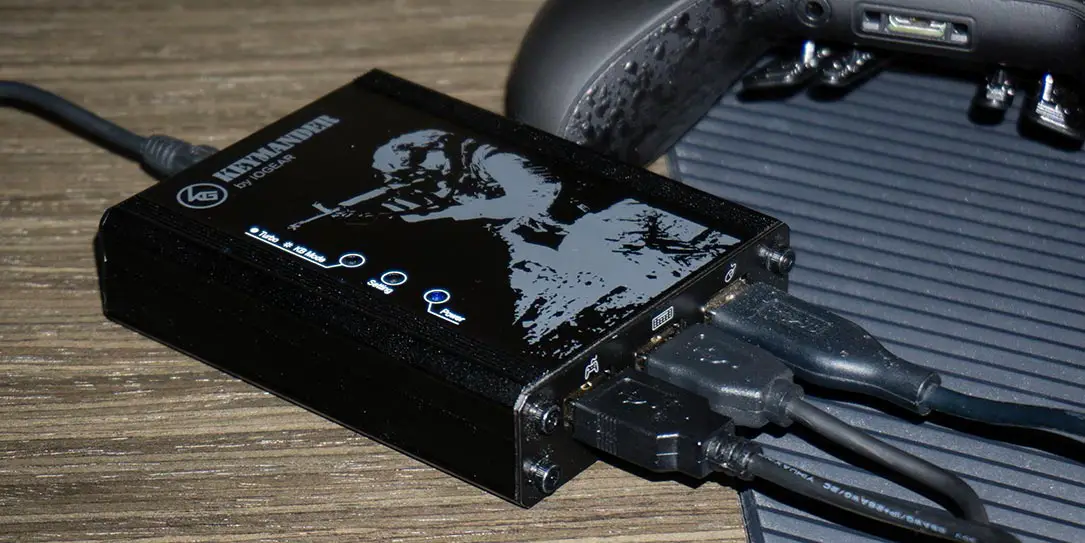
The Kaliber Gaming KeyMander is a pretty non-descript looking black box. It features a solid construction with a metal frame all around. The Kaliber Gaming Logo and Keymander wordmark are printed in a dark grey on the top of the Keymander, along with a stylized soldier. Three LEDs for Power, Setting, and Turbo/KB Mode are also on the top of the device. The Setting LED turns blue when the KeyMander software is connected to the KeyMander, flashes blue quickly when uploading profiles from a computer to the KeyMander, and flashes slowly when Direct Mapping Mode is enabled. The Turbo/KB Mode LED stays solid orange when Turbo mode is enabled and flashes orange when in Keyboard Mode.

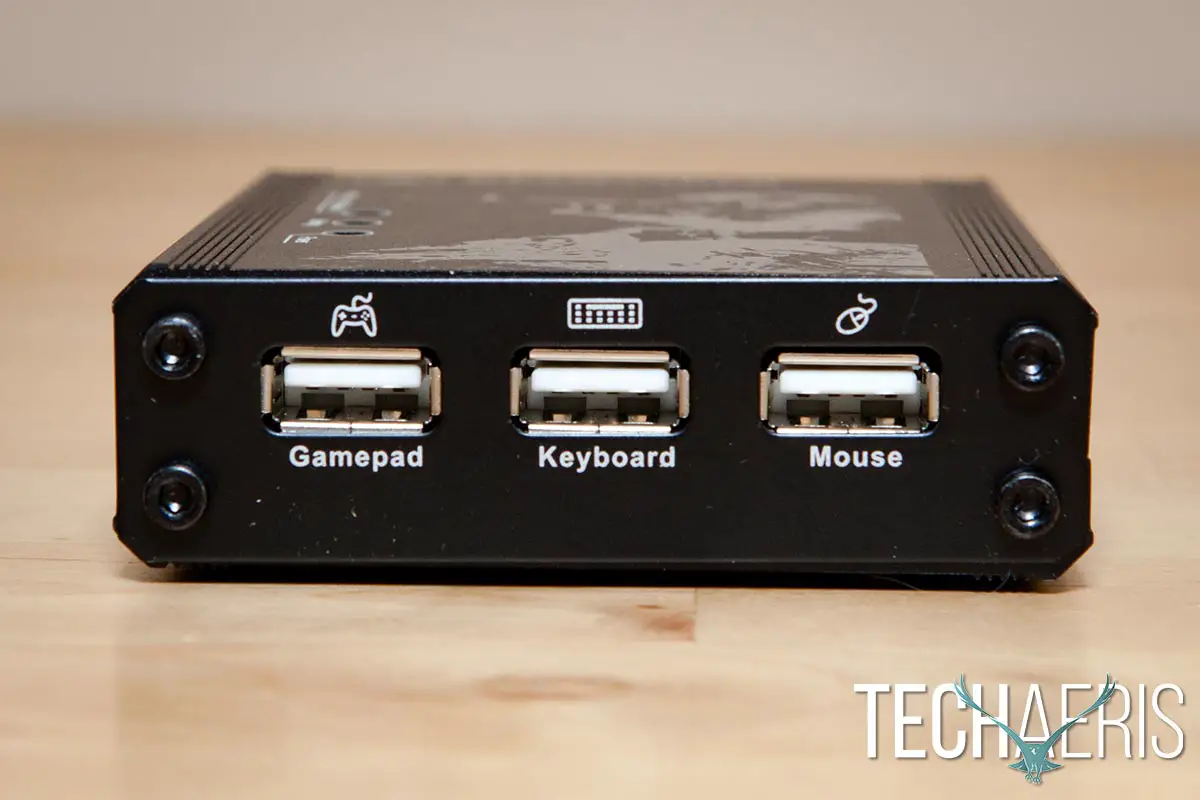
On one end of the KeyMander, you’ll find three USB-A ports which are labeled Gamepad, Keyboard, and Mouse. This is where you’ll plug in your controller, keyboard, and mouse for use with your game console.

The other end of the KeyMander has a reset button, 3.5mm data port, and three mini-USB ports labeled Game, PC, and Power. The Game port connects your KeyMander to your Xbox or PlayStation console and will also power the KeyMander while plugged in. The PC port is used to connect to your PC for configuring the device with the KeyMander software but does not power the unit. When connected to a computer, or when using a keyboard with LED lighting while connected to a console, you’ll also need to connect the KeyMander to a 5V power source using the Power port.

The bottom of the KeyMander has four rubber feet which provide a solid grip on whatever surface you’ve set it on.
Overall, the KeyMander is well designed and solidly built.
Installation/Setup
The KeyMander does come with some default profiles, but the first thing you’ll want to do is connect the KeyMander to your PC or laptop. Unfortunately, you need two USB ports to connect the KeyMander, one for data and the other for power. Once you’ve connected it to your computer, download the KeyMander configuration software from the KeyMander product page. The PC KeyMander app is a standalone .exe file that doesn’t even install on your computer, simply double-click on the .exe file to launch it and start configuring.
After you’ve downloaded the software, you’ll want to check for firmware updates. To do so, you’ll need to click on the settings cog in the KeyMander software, then the info icon in the upper right hand corner of the next screen that pops up. This will tell you what firmware and software versions you are running. Below this information is a link to the drivers. You’ll have to click on it and then compare the latest drivers on the KeyMander website with those the software says you have installed and if different you’ll need to download the newer firmware and update it by selecting Help > Firmware Upgrade in the software.
There are actually two ways to set up the KeyMander, the first through the software — which I highly recommend — and the second by using the controller itself. We’ll discuss the software a bit more further down, and it allows you to map your controller buttons and sticks to keyboard keys, mouse movement, and mouse buttons. The second, Direct Mapping Mode, allows you to user your controller and map the controller buttons directly to the keyboard. On the Xbox One, press the View + Menu buttons at the same time, then press the Xbox button. Next, press a controller button then press a key on the keyboard to map that button to a specific key. If you hear a single beep, the mapping was successful. Continue this process until you’ve mapped all the buttons you want then press the View + Menu buttons at the same time to exit Direct Mapping. A double beep will indicate that you’ve successfully exited this mapping mode. While you can map your buttons to the keyboard this way, they are not stored in a profile, hence it is much better to use the software to map your buttons.
The KeyMander is definitely not a plug-and-play device, and to get the most out of it, you are going to need some patience and spend some time with it. It’s not that difficult, and the manual is pretty straightforward. In addition, the KeyMander forums have some great posts and additional videos to help you get started if you should run into issues.
Once you’ve configured the KeyMander to include the games you want to play, connect your PlayStation or Xbox controller to the Gamepad Port, a USB keyboard to the Keyboard Port, a USB mouse to the Mouse Port, and finally connect your console to the Game Port using the Mini-USB to USB cable. When connected to a console, you don’t need to connect to the Power Port on the KeyMander as the console will power it just fine. However, if you are using a keyboard with extra lighting or power requirements, you may have to connect the KeyMander to a power source as well. If you wish, you can also connect a laptop to the PC Port for quicker configuration while connected to your console.
It’s not difficult to set up by any means, but there are a lot of cables involved. Depending on your setup, this could get a bit cluttered, especially if you’re using a home theatre and projector setup.
Ease of Use
In the case of the KeyMander, ease of use and software go hand in hand but I’ll be breaking it down separately. This section will focus mostly on how easy it is to use once you’ve set it up.
Once you’ve configured the KeyMander for the games you want to play, the Function keys on the keyboard play a big part in using the KeyMander. Your F1-F8 keys switch which game profile you want to use. A single beep on the KeyMander will let you know the profile has been changed. The F9 key switches between Keyboard and Controller Modes. In Keyboard Mode, you can use the keyboard to type during gameplay, for example in chat windows. While in Controller Mode, you’ll be using your keyboard and mouse to play the game. A single beep indicates you’ve switched to Controller Mode, while a Double Beep indicates you’ve switched to Keyboard Mode.
If your controller supports Turbo Mode, you can use F10 to turn it on or off. Turbo mode allows for rapid firing of a controller button and can be enabled to disabled on any button and set to an intensity level of 1-3 based on how “rapid” you want that button press to act.
A feature that many gaming keyboards have is a macro mode. Consoles and controllers don’t, but with the KeyMander you can set up Macros using the software. Pressing F11 will toggle Macro Mode on or off. A single beep indicates it is on, while a double beep indicates it is off.
Finally, hitting F12 toggles Play Mode. When Play Mode is on (indicated by a single beep), the keyboard on your laptop, if connected, is locked out and signals from the USB keyboard are sent to the game console. When Play Mode is off, the keyboard on the laptop can then be used for gameplay on the console.
While it sounds a bit confusing, the hardest part will be remembering which profile you assigned to the eight different slots for toggling when switching games. Once you’ve set it up the way you like and connected to your console, you’ll only need to re-assign your profiles if you decide to play a different set of games.
Software
The KeyMander PC app is a standalone .exe file that doesn’t even install on your computer. Simply download it from the KeyMander website, connect your KeyMander to your PC, and double click on the .exe file. I’m not going to go into too much detail as that is probably a post in itself, but will definitely touch on what you can do with the software.
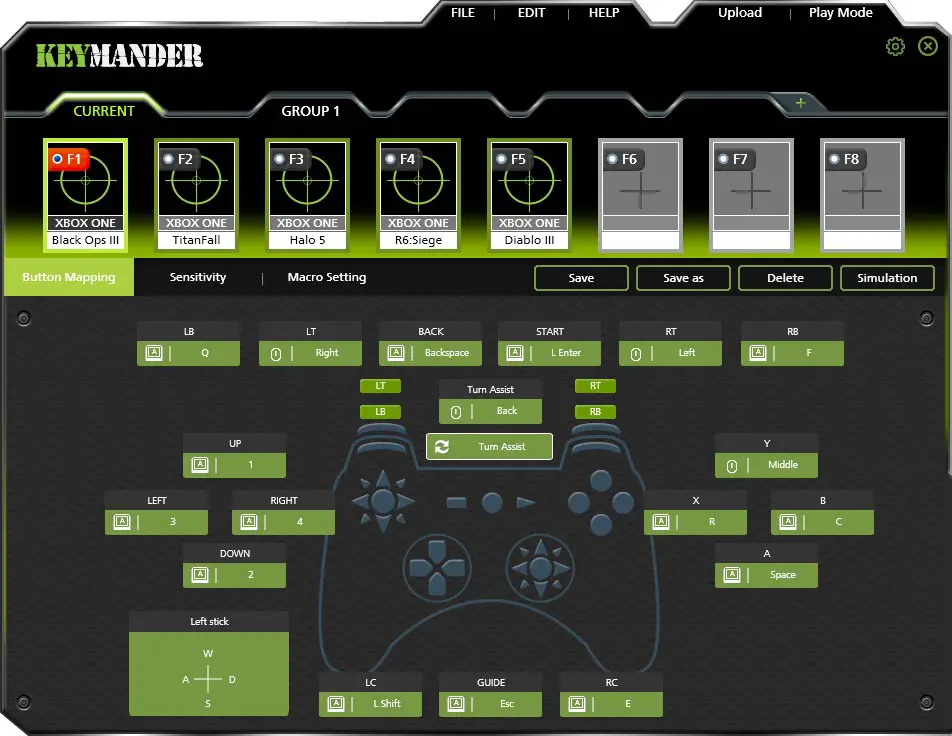
When you first launch it with your KeyMander connected, you’ll see a “Ready! Click to begin” message. Clicking it displays the main interface which includes File, Edit, Help, Upload, and Play Mode tabs across the top, as well as a settings cog and a close app button. The File menu item lets you save profiles, import and export profiles and groups, and exit the program. The Edit menu lets you delete a profile or group, rename a profile, change the cover for a profile, and copy and paste a profile into another group. The Help menu is where you’ll be able to perform a Firmware Upgrade, change keyboard settings, menu language, KeyMander beeps, set your mouse DPI, and reset to factory defaults. The Upload tab is an important one as it is what you click to upload the current group of profiles to the KeyMander. Uploading a new group will overwrite all the existing profiles on the KeyMander. Play Mode is used to toggle the previously mentioned laptop/USB keyboard settings.
The meat of the KeyMander software allows you to set up to eight different profiles in a group. You can create up to 32 groups in the KeyMander app and with 8 profiles in each, that adds up to 256 game profiles you can have configured on your computer. Clicking on a group tab will highlight the group name in green, and clicking on one of the profiles within the current group will show the button mapping layout for said profile. The currently active profile on the KeyMander is also indicated by a red tab in the upper left hand corner of the profile box.
The profile layout shows a controller with all the buttons and keymappings around it. The controller shown will be similar to the console you’ve previously assigned to the group. Clicking on one of the mapping areas will allow you to change the corresponding key/button mapping and allow you to set Turbo mode if you wish. At first, it can be confusing once you’ve clicked into a specific button to map and to get back out there is a View All button to the far right of the screen.

You can also set your Aim Look Mode and ADS (Aim-Down-Sight) Mode sensitivity, Deadzone setting, and Curve setting. I mentioned macros previously. This is definitely a huge setting that will give you an advantage over non-keyboard players. Each profile can have up to 8 custom macros and each macro can store up to 8 different controller buttons which are mapped to a single key press. When assigning button presses to a macro, you can specify if the buttons are pressed together or if they are pressed one by one in sequence.
While it may seem confusing and daunting at first, it is pretty straightforward. If you wish to, you can also head over to the KeyMander forums and download some profile presets to upload so you don’t have to configure your games from scratch, which will save some time but may not leave the game set up the way you like. Kaliber Gaming does have a very nice setup video that covers everything from updating your firmware to setting up custom game profiles.
Performance
Once you’ve taken the time — and I’ll stress again, you’ll need to take the time — to set up the KeyMander for the games you want to play, and connected the KeyMander, keyboard, and mouse up to your console, you’re ready to go.
While a keyboard and mouse are directly connected to a computer for PC gaming, with the KeyMander the keyboard and mouse first go through the KeyMander which translates the key presses and mouse clicks into the corresponding controller buttons. Fortunately, the response time was very decent and I was hard pressed to notice any lag — if any at all. The mouse movement was snappy as was aiming and firing, as well as the response of the other keys mapped to various controller buttons. I would recommend playing offline before diving into online multiplayer matches just in case you want to make any final tweaks. For the most part, the sample profiles provided on the KeyMander forums worked just fine, although it’d be nice to see a few more in the non-FPS category offered up.
In my experience, the KeyMander does seem better suited for FPS type games like Gears of War, Battlefield, and Call of Duty as opposed to RPGs and menu-heavy games like Diablo III or Mass Effect. Given the KeyMander game profiles that are available in the forums, it seems that Kaliber Gaming concurs. It will definitely work with pretty much any game you can configure, it really just boils down to just how much time you want to spend configuring some of those games with more control options.
Price/Value
With an MSRP of $99.99USD, the Kaliber Gaming KeyMander is reasonably priced if you’re looking for a way to use your keyboard and mouse on your console. It’s currently selling for just over $85USD on Amazon for some additional savings. Of course, you’ll have to factor in the price of a keyboard and mouse and your mileage may vary depending on what you decide to use.
Wrap-up
The KeyMander is a decent option for those wanting to use a keyboard and mouse on their consoles for gaming until the day they are natively supported. As you can see, there are many benefits provided by the KeyMander for using a keyboard and mouse combination including Turbo mode and macros. Just be prepared to spend some time beforehand reading the manual and setting it up properly.


