
To be honest, I love when something a little unique comes across our desk to review here at Techaeris. Our BenQ ScreenBar review takes a look at an e-reading lamp that sits on top of your monitor to provide extra light while you’re working. Read on to see what we thought of it!
Specifications
The BenQ ScreenBar e-Reading Lamp has the following features and specifications:
- Auto-dimming by
built-in ambient light sensor Specially designed clip makes the attachment onto monitors easy- Zero reflective glare off the screen
- Light source: Dual color LED
- Color Rendering Index: 2700K: Ra 82; 6500K: Ra 87
- Illuminance: 1000 lux in the center (height 45cm)
- Luminous Flux: 2700K: 300lm; 6500K: 320lm
- Color Temperature: 2700~6500K
- Power Input: 5V, 1A USB port
- Power Consumption: 5W (max.)
- Materials: Aluminium alloy, PC / ABS
- Dimensions: 45cm x 9.0cm x 9.2cm
- Net Weight: 0.53kg
What’s in the box
- BenQ ScreenBar e-Reading Lamp
- Clip
- Micro-USB to USB-A
power cable

Design
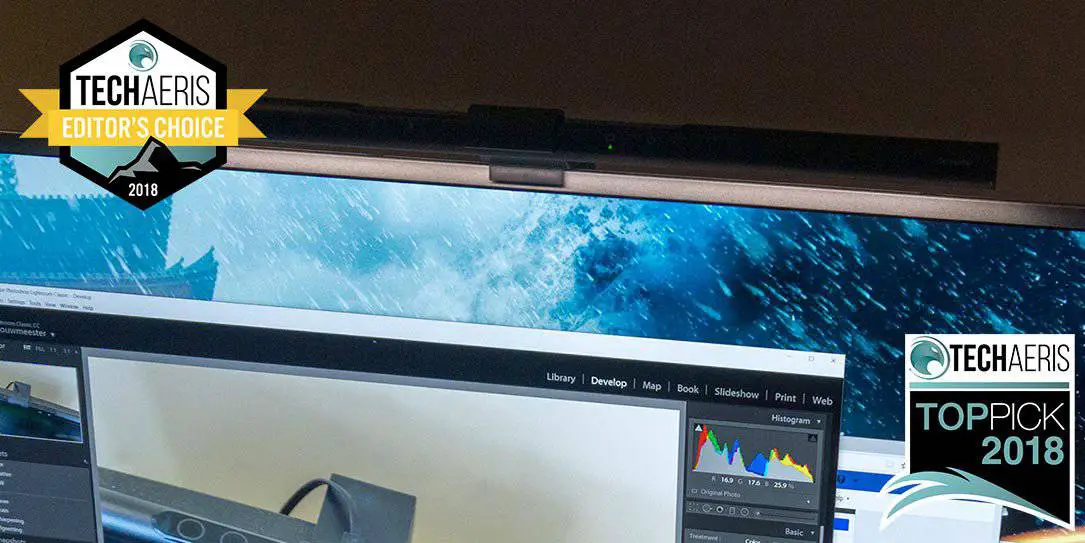
The BenQ ScreenBar e-Reading Lamp consists of two main pieces: the light bar and the clip. The light bar is slender with a diameter of 7/8-inch and a length of 17 3/4-inches. The bottom is flat to accommodate the lamp. The middle 6 1/2-inches is cut out a bit on the top to accommodate the four buttons and sensors. From left to right are the Manual Dimmer button, Hue Adjustment button, light sensor, Auto Dimmer button, and power button. The Micro-USB port is located at the back of the lamp.

The aluminum alloy construction of the lamp is nice and durable. The end caps are plastic as is the frame around the USB port and top buttons. The front of the lamp bar has symbols for each of the buttons and the ScreenBar name in white on the far right. Overall, it’s a pretty sleek design that will complement just about any
The clip consists of a main weighted piece roughly 1 3/4-inches across and in diameter. This main piece connects at a joint to a 1/4-inch thick arm which angles up into the actual clip. The clip is where the lamp bar attaches and has a hole in the back for access to the Micro-USB cable. The underside of the clip arm and the front of the counterweight have a rubber piece attached to them to prevent scratching or damage to your monitor. By my measurements, the ScreenBar should attach fine to any monitors less than 2-inches thick which definitely shouldn’t be an issue given how thin monitors are getting these days. That being said, BenQ recommends you use the ScreenBar on monitors between 1 and 3cm thick.

One setup you won’t want to use this with is a laptop. I did try it with a couple (because science?) but the weight of the ScreenBar isn’t conducive to use with a laptop as the screen can’t support the weight and the screen just falls backwards as far as it will go depending on the laptop.
The BenQ ScreenBar e-Reading Lamp doesn’t look out of place atop your monitor and — especially in lower light conditions when in us — blends right
Installation
The BenQ ScreenBar is super easy to set up and install. Simply clip the lamp bar into the clip and then plug the Micro-USB cable into the back of the lamp bar. Next, set the assembled ScreenBar on the top of your monitor. The clip has a small piece that anchors against the front of your monitor and the counterweight rests against the back of your monitor. Finally plug it into an available USB-A port on your computer, monitor, or laptop. Once you’ve done that, you’re good to go!

In case you don’t have an extra USB-A port on your computer, you can use a USB power adapter or power bank, as long as the power output is rated at 5V and supplies at least 1A of power. BenQ also recommends on only using the included cable to prevent possible issues. Given the included cable is just under 5′ in length, most people shouldn’t have any problems connecting it to their computer.
Ease of Use
The ScreenBar is just as easy to use as it is to set up. When you want to use it, touch the power button on the right side of the control area and the light will turn on. By default it will auto-adjust to the surrounding light and set the brightness and colour balance.
If you ever need to recalibrate it, you can touch the auto dimmer button and it will auto-adjust once again to your surrounding conditions. You can also set the brightness and hue manually by pressing and holding down the appropriate button.
While the buttons do work, they did seem to be a bit finicky the odd time. This could partly be due to the fact that you can’t see the actual buttons and could just be a side effect of having to feel for the button you want. I didn’t encounter the issue that often, but often enough to warrant mentioning here.
Performance
My first concern with attaching a lamp bar to the top of my monitor was brightness and glare. Everyone knows what happens when you have a lamp sitting off to the side or when working near a window with sun glaring through it. I have to say, as soon as I turned on the lamp with the main lights down low, I was sold.
BenQ rightly claims there is no glare on the screen from this lamp. I was very impressed and the light does indeed just illuminate your desk below and in front of the light. Checking out the diagram provided by BenQ shows how they managed to achieve this.

For the most part, I let the ScreenBar self-adjust. Like their Brightness Intelligence Plus technology featured in monitors like the BenQ EX3501R and the BenQ EW3270U, the auto dimmer and adjustment worked fantastically. The sensors and adjustments

Price/Value
With an MSRP of $99.99USD, the BenQ ScreenBar e-Reading Lamp might seem expensive for a simple desk lamp on your desk. However, after using it, it’s not hard to see the value here given the self-adjusting brightness and colour hue depending on your surrounding light sources.
Wrap-up
If you spend any time working in dimmer lighting conditions, the BenQ ScreenBar e-Reading Lamp should be on your “must have” list. It’s easy to see why it’s deserving of a Top Pick of 2018 Award here at Techaeris.
*We were sent a sample of the BenQ ScreenBar for the purposes of this review.
Last Updated on December 16, 2018.