 Monoprice was originally known for (and still is) its quality, but much more affordably priced, computer components, cables, and more. They’ve been branching out over the past couple years and our Strata Home SmartVAC 2.0 review takes a look at a robotic vacuum with automated, scheduled cleaning modes, mop attachment, home base memory, and more.
Specifications
The Monoprice Strata Home SmartVAC 2.0 has the following features and specifications:
- Built-in timer for automated, scheduled cleaning
- Swappable roller-brush and vacuum suction kits
- Includes mopping pad and water tank attachment
- Automatically adjusts the suction power based on the type of floor detected
- One button cleaning operation
- Washable 0.5-liter dust bin
- Four built-in cleaning modes: Auto, Spot, Edge, Zig-Zag
- Dust Bin Capacity: 0.5L
- Cleaning Time: 90 – 100 minutes
- Charging Time: 240 – 300 minutes
- Battery: 2150mAh Lithium-ion
- Input: 24 VDC, 600mA
- AC Adapter Input Power: 100 ~ 240 VAC, 50/60Hz, 0.5A
- Dimensions: 13.4 x 3.5″ (340 x 88mm)
- Weight: 7.7 lbs (3.5 kg)
What’s in the box
- SmartVac 2.0 with installed suction attachment, dust bin, and HEPA filter
- Charging station
- AC power adapter
- Remote control
- Roller brush attachment
- Mopping pad and water tank attachment
- Spare HEPA filter
- Double-ended cleaning brush
- 2x left side brushes
- 2x right side brushes
- User manual
- Required: 2 AAA batteries (not included)

Design
Main unit
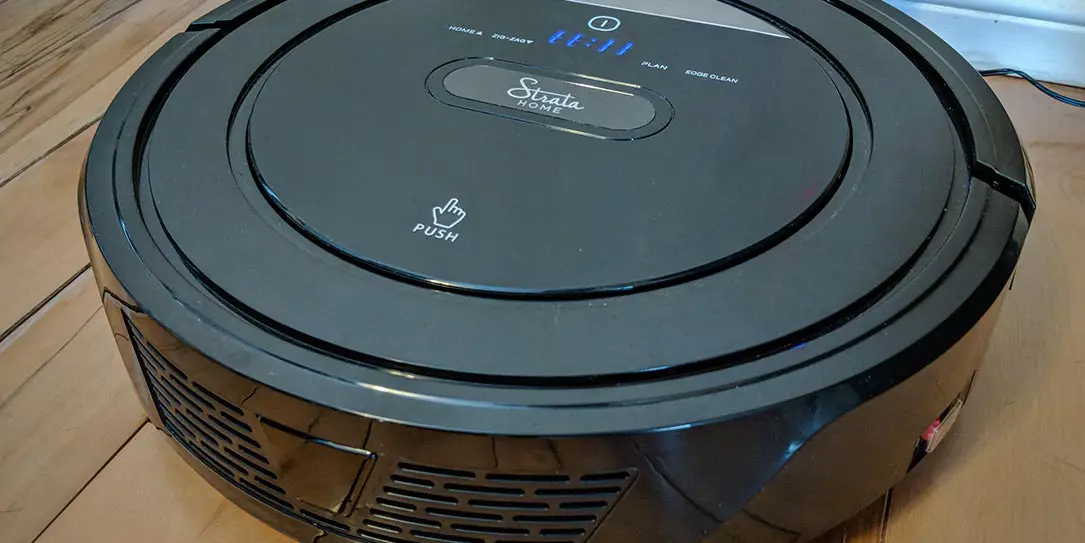
Like most robotic smart vacuums on the market, the Monoprice Strata Home SmartVAC 2.0 has a round, disc-shaped design. Measuring just over 13″ in diameter, the SmartVAC sits about 3 ½” high. The entire vacuum is glossy black for the most part (which is a major dust magnet), with the exception of some white writing and a silver piece above the access cover. The access cover sits in the middle of the top of the vacuum and is about 8 ¾” in diameter. On the cover is where you’ll find the LED display and Standby touch key as well as white text for the four modes: Home, Zig-Zag, Plan, and Edge Clean. An ovalish badge sites in the middle of the cover with the Strata Home logo printed in white on it.

Opening up the cover, which is achieved by pushing where it says “Push” on the bottom edge, reveals the removable dust bin. The dust bin comprises of four main pieces: the dust bin, the primary filter, the HEPA filter, and the HEPA filter shelf. A small double-ended cleaning brush to clean the HEPA filter is snapped into place on the top of the dust bin as well.

Around the outer edge of the SmartVAC, you’ll find vent slates located at the very front. Towards the right side, just before the 4 o’clock position, is the power switch while on the opposite side at the 8 o’clock position is a power plug-in port. The entire back half of the vacuum has a bumper strip down towards the bottom of the unit.

The bottom of the SmartVAC is where you’ll see the external working components of the device. Just forward of the midway point of the vacuum are the textured left and right wheels with the component receptacle in between. The component receptacle is where you can swap out the pre-installed suction component or the roller brush component depending on what surfaces you plan on using the vacuum with. The component can be removed by a push clip located near the right wheel. Towards the back of the unit are the replaceable right and left-side brushes which consists of three evenly spaced filament brushes roughly 2 ¼” in length. Finally, centered at the back is a small, universal wheel between the two charging pole plates.

Components
The roller brush component comes apart for easier cleaning and consists of three pieces: the roller brush cover plate, roller brush (with bearings and bushings on one end), and the roller brush holder. It’s definitely handy having this piece come apart as the user manual recommends cleaning this piece regularly and it does get clogged up with hair rather easily.
The suction component is a single unit with an angled rubber edge alongside the front of the suction hole and considering it’s intended use there’s not much else to it.
The mopping pad and water tank are a two-piece add-on for the vacuum. The mopping pad is white on one side and white and blue on the other. The white side goes face down on the bottom of the water tank attachment and is held in place by eight velcro like sections on the attachment. Flipping the water tank over and you’ll see the actual water tank isn’t that large and is a rather small curved reservoir with a rubber plug at the top. This reservoir holds about a ½ cup of water — which isn’t all that much. Once the water is poured in, it flows towards the back of the attachment plate and slowly soaks through onto the mopping pad. The attachment attaches into place by way of four knobs located on the attachment that snap into place via four holes on the bottom of the vaccum.

Charging station
The charging station is pretty straightforward and consists of a back piece that is 7 ¼” wide and about 3 ¾” in height. At the foot of the back piece is a small plate with two charging poles on it. A power indicator light is on top of the back cover piece and the charging socket is located on the lower left hand side of the charging station.

Remote control
Finally, the remote control is handy but pretty simple. Roughly 4 ¼ x 3 ¾ x ¾” in size, the remote has an On/Off button at the top, four arrow buttons surrounding a circular button below that, and finally Home, Mode, and Spot buttons underneath those about halfway down the remote.
Setup
First, you’ll need to setup and charge the vacuum. It is recommended to place the charging station against a wall with at least 1 meter (3 feet) of space on each side and 2 meters (6 feet) in front. Due to our layout, our station was setup with about 2 feet of space on either side and 3 feet of space at the front and it seemed just fine. Plug the charger in, flip the power switch on the vacuum to the on position and pace the vacuum on the floor — not on the charger — with the back facing towards the charger. Next, press the Home button on the vacuum or the remote and the vacuum will dock itself and begin charging. While charging, the LED display will show a series of 1s in the format 11:11 progressing from left to right. Once fully charged, which takes upwards of 6 hours to complete, the LED display will show the word FULL instead. Monoprice recommends charging the battery for 12 hours before first use.

Once it’s started charging, you’ll probably want to set the clock on the vacuum, especially if you have plans to use the Schedule mode. This is pretty easy to do, simply press the Plan button on the vacuum while it’s in standby mode and the hour display should start to flash. Pressing Home will increase the hour while pressing the Zig-Zag button will decrease it. Once the hour is set, press the Standby button to confirm it and the minute display should start to flash. Set the minute the same way you did the hour, press the Standby button again to confirm, then finally press the Plan button to exit the clock setup mode.
The SmartVAC 2.0 does ship with the suction component installed, if you want to swap out for the roller brush component, you might want to do that before placing the vacuum on the floor for initial charging.
Ease of use
After the Strata Home SmartVAC 2.0 has fully charged for at least 12 hours, you’re good to go. You can control the vacuum directly from the unit or from the included remote control. To start cleaning, simply press the Standby button on the vacuum and it will automatically enter Normal Cleaning mode. When cleaning is in progress, it’s easier to use the remote to include it rather than try and reach a button on the vacuum while it’s moving.
As far as controlling the SmartVAC 2.0 from the remote, pressing the On/Off button will start or stop the cleaning process. During cleaning, you can press the Home button to make it return to the charging base. The directional buttons will instruct the vacuum to go forward, back, or turn left or right and the center button amongst these has no effect. Pressing the Spot button while it’s cleaning will instruct the vacuum to spot clean that specific area. When it’s completed the spot clean, it will return to normal mode by itself. Finally, the Mode button lets you cycle the vacuum through the four previously mentioned cleaning modes.
Performance
Cleaning modes
When the SmartVAC 2.0 starts cleaning, it enters Normal or Auto mode. While in this mode, the vacuum will use a mix of Zig-Zag, Spot, and Edge Cleaning modes based on the obstacles it encounters while cleaning. When in Zig-Zag mode, the vacuum tries to clean in long parallel cleaning paths. When it encounters an obstacle, it will turn 90º and try to go forward again before it encounters another obstacle and repeating the 90º turn. While observing the vacuum in our setup (which I’ll get to in a minute), this was the mode it seemed to stay in most of the time. It was fun the first time watching the vacuum navigate and figure out the best paths for cleaning.

Should the vacuum encounter a particularly dirty spot, it will enter Spot Cleaning mode and turn in circles to try and give that area some extra cleaning love. Edge Cleaning does pretty much what it sounds like and follows along the edge of your walls or other obstacles to clean around the edges. You can easily tell what cleaning mode the vacuum is in by looking at the display. Auto Cleaning displays 222 on the LED, Zig-Zag displays 1111, Edge Cleaning displays 3333, and finally, Zig-Zag displays 4444 on the LED.
The vacuum can also be set up to clean automatically at a specific time each day. This is done right from the vacuum by pressing and holding the Plan button down for two seconds. If no scheduled time is set, the LED will display 00:00, if one is set then that will be displayed instead. In either case, the hour will be flashing. To set the scheduled time, simply follow the same steps to set the clock time and you’ll be all set. When that time hits every day, the vacuum will start vacuuming and return to the charging station once it’s finished cleaning.
Once it’s finished cleaning, the SmartVAC 2.0 will automagically return by trying to trace a path back to the charging station base for recharge. Should the battery start running low while vacuuming, it will also return to the charging station to recharge itself. To be honest, the first time we told the vacuum to return Home, even though it took a few minutes and a couple wrong turns, everyone was pretty impressed by the fact that it managed to find its way home.
How well does it clean?
So the big question is, just how well does it clean? The main floor of our house consists of hardwood and is pretty open with a kitchen kitty corner off the living room. The kitchen has the typical table and six chairs set up and an island in the middle of it. The living room area has a couch, love seat, and chair with a low pile area rug in the middle. Off the living room is the front entrance to the house which is tile and separated from the hardwood with a wood strip. Off the back of the living room is a hallway to a bathroom and the back laundry room — both also tiled and separated with a wood strip. Oh, and we have two dogs (lab crosses) so as you can imagine, there’s a fair amount of hair that accumulates on the floor every week.
Our typical weekly cleaning consists of sweeping — which does a pretty decent job of getting most of the hair and dust up — or vacuuming the entire floor and area rug — which seems to do a better job of cleaning. In either case, the entire process takes about 10 to 15 minutes. The thought of having a vacuum that automatically does the job for you is definitely appealing and we were eager to see how the Strata Home SmartVAC 2.0 performed.
One cause for concern that we saw mentioned in the user manual was that the vacuum is not recommended for use around “curtains, cords, loose cables, fragile objects, loose debris, or anything that could get easily knocked over.” In our case, we do have a few cords — mostly network cables — running around the edge of the living room but a couple of short distances where a cable or power cord runs across the floor to under the couch or love seat. Because we were watching the device, however, we decided to let it run its course and see what happened.
Having shipped with the suction component installed, we started off with that. While it did an o.k. job on the hardwood floor, I figured the vacuum would clean better with the roller brush installed. With the suction component, we had to empty the dust bin once during cleaning and it was about half full again once the cleaning of the entire hardwood floor area and area rug was finished. The following weekend, we repeated the process with the roller brush component installed. As suspected, the roller brush definitely cleaned the hardwood floor area much better and we had to empty the dust bin twice while cleaning and there was a minor amount of dust and hair in it once it was finished. However, the vacuum didn’t fare as well on the area rug and in fact, acted a little jumpy trying to clean it. own,
In the case of both the suction and roller brush components, the vacuum actually had no issues going over the network or power cables it encountered. However, when it came to the area rug, sometimes it continued cleaning over the rug while others it would detect it as an object and turn to try and avoid it. The same happened when it encountered the wood strips between the hardwood and tile sections of the main floor. Sometimes it would jump over the strip and continue vacuuming the tile while others it would turn as if it had encountered an obstacle.
If you recall, I previously mentioned that sweeping and/or vacuuming by hand takes about 10 to 15 minutes. With the SmartVAC 2.0, it took over 30 minutes to do the same area and anywhere between 5 and 10 minutes for it to return to its charging base. While in some ways it did a better job, in others the issues encountered while cleaning meant that, at least in our house setup, it’s not something that we can really leave and let run without supervision.
That being said, when used daily, the suction component would fill the dust bin about one-third full and the roller brush component about half full. It’s definitely something that if you feel comfortable with it running on its own or every day while keeping an eye on it, it definitely alleviates some of the daily or weekly cleaning process.
Post-cleaning
Of course, after the vacuum has finished cleaning there’s still manual work to be done. The dust bin needs to be emptied (and a mentioned above, may require emptying during cleaning). The user manual recommends turning the vacuum off before removing the dust bin. The dust bin is easy enough to remove and empty, and while you’re at it it’s recommended to brush off the HEPA filter as well. In addition, the user manual recommends a thorough cleaning of the dust bin with mild soap and water and brushing off the filters after each use.

The user manual also recommends cleaning the side brushes as needed, wiping the sensors and wheels with a soft, dry cloth after each use, periodically wiping the charging poles with a soft, dry cloth, cleaning the suction component and dust sensor with a soft, dry cloth after each use, and periodically cleaning the roller brush attachment using warm water. Even though it only takes about 5 or 10 minutes, that’s an awful lot of “after each use” cleaning for something that’s supposed to be cleaning for you…
Battery Life
According to the manual, the Strata Home SmartVAC 2.0 lasts between 90 and 100 minutes before needing to be recharged. Given our setup and the time it took to complete cleaning the floor, the battery life was more than ample and considering the vacuum parked itself back on its charger, battery life really isn’t an issue. You’d have to have a pretty big layout for this vacuum to require over an hour-and-a-half to clean your floor.
While it takes up to 6 hours for it to completely recharge, if you’re vacuuming once a day this also won’t be an issue if you keep the charger plugged in and the vacuum parked on it when not in use.
Accessories
We usually reserve the Accessories section for optional accessories but in this case I’ve opted to discuss the mopping component here. When one thinks of a vacuum or a smart vacuum, mopping doesn’t usually play into the equation. Monoprice does include the mopping pad and water tank attachment with the SmartVAC 2.0 so we took it for a quick spin as well. While it does an o.k. job of mopping a pre-swept or pre-vacuumed floor, the reservoir is very small and works best when you only want to mop a small area. As well, the manual mentions filling it with water and nothing about whether you can or can’t use cleaning chemicals but I’d be hesitant to given the design and small size of the reservoir. While a nice addition, unfortunately, it’s not very useful for larger areas which is something I think you’d want given it vacuums large areas just fine.

Price/Value
The Monoprice Strata Home SmartVAC 2.0 has an MSRP of $199.99USD. This is definitely more expensive than most standard vacuum cleaners. With the SmartVAC 2.0, and other smart vacuums, the price is more about unattended convenience (in my opinion). For the functionality and what you get, the SmartVAC 2.0 is fairly reasonably priced and is in line with pricing from other manufacturers. Sure, there are far cheaper ones on the market, but for the most part most decent branded ones seem to be priced around the $200 mark. However, the value does take a bit of a hit here — and I’d assume the same for other smart vacuums — in my case due to the layout of my house, and I suspect many houses will have similar challenges with a mix of flooring and carpets as well as the odd cord here or there.
Wrap-up
While the Monoprice Strata Home SmartVAC 2.0 works well on certain surfaces, depending on the layout of your house you may be spending more time watching it and assisting it as opposed to having it vacuum entirely on its own. It really depends on your layout, how much floor versus rug you have in the level you’re cleaning, and how much time you want to spend cleaning the vacuum after each use as recommended by the user manual. While the suction component is adequate and works well enough for areas which have area rugs or rug sections, the roller brush component is definitely the way you want to go for a better clean.
To be fair though, I’m sure that the same issues hold true for almost all smart vacuums on the market today.
*We were sent a review unit of the Monoprice Strata Home SmartVAC 2.0 for the purposes of this review.
Last Updated on December 26, 2019.