Estimated reading time: 6 minutes

When it comes to genealogy, photographs and documents play a major role. Sometimes, however, these photos and text documents can be faded and hard to read. While apps like Adobe Photoshop and Lightroom can help fix these issues, they are expensive, have a steep learning curve, and time-consuming. Fortunately, there are programs that can help the average user restore their old images and documents.
Our Vivid-Pix RESTORE review looks at an easy-to-use program that lets you restore scanned prints, slides, documents, and digital camera images quickly. Read on for our full review!
Specifications
Vivid-Pix RESTORE has the following features:
- Patented artificial intelligence restores images with 1-click. Fine-tune with easy controls.
- Improves JPEG, TIFF, PNG, DNG, BMP and RAW images.
- Automatically creates high-resolution JPEG and/or TIF images –without affecting the original.
- Automatically creates sharing file size for posting on genealogy sites and emailing.
- Crop and create the perfect image.
- Add Metadata – click View/Edit Metadata to add searchable Tags and comments that are saved to your fixed image.
- Create folders and organize improved images (example: Census Records, Aunt Gladys, Vacation 1970…)
- Windows 10/Mac Versions
- Free trial with 10 fixes
Installation
Considering Vivid-Pix RESTORE comes with a free trial, you can head over to the website and download it, then install it like you would any other application. Once you choose to purchase the program, you can do so from the same website.
To activate the software on Windows, simply follow these steps:
- Download and Run the software on the computer
- Install the software onto the computer (you are in Free Trial mode – 10 free fixes)
- Follow prompts by clicking the appropriate buttons to buy or register the program
- Enter the email address that you used when redeeming the Code next to the Activate button
- Click Activate
To activate the software on Mac:
- Download and Run the software on the computer
- Install the software onto the computer (you are in Free Trial mode – 10 free fixes)
- Open click OK and Skip opening pop-up windows (you have already “purchased”)
- Click Buy/Activate at the top of the software screen
- Enter the email address that you used when redeeming the Code next to the Activate button
- Click activate
Once you’ve activated, you’re good to go!
Interface
Vivid-Pix RESTORE is, unfortunately, kind of dated looking. Upon launching the app, the interface has a File bar, selection bar, image preview section, and more buttons at the bottom with fix type, image mode, rotation, and output options. While easy to read and find these options, it is pretty cluttered looking and could do with a refresh. That being said, it’s not the end of the world.

Ease of Use
Vivid-Pix RESTORE is pretty simple to use. To start the image or document restoration process, click the Select Image(s) “button” in the brown bar. Browse to your folder of images and select the ones you wish to enhance. Next, a pop-up with five fix types (Faded Print or Slide, Badly Faded Print or Slide, Digital or Cell Phone Camera, Faded Document or Text, and No Image Correction Add Metadata Only) with a grid of nine possible fixes appears. Selecting the different blue Fix Type buttons will change the previews in the grid array. Once you’ve found a fix you like, select it. When you select it, you’ll return to the main interface with both views visible.
From there you can change the fix type, select full color, black & white, or sepia tones, rotate, crop, and toggle sharpening. If you select the purple Detail Edit button, you can fine-tune the edit. Doing so gives you more control over lightness, contrast, vividness, sharpening, cyan/red, magenta/green, or yellow/blue color balance. You can also save this as a custom setting for future use. Finally, click the green save/next button in the lower right corner and it will save the current image to your set output folder with a chosen suffix so as to preserve the original image. In addition to a full-sized restored version, the app also saves a slightly smaller shareable one for web and email use. Once saved, the app will open the next image if you have a bunch queued up.

During the process, there are options along the top to skip one image, skip all images, view/edit the image metadata, and set your preferences.
If you do get stuck, there are a few helpful tutorials on the Vivid-Pix website.
Performance
As far as performance is concerned, you can restore an image in as little as five seconds if you stick to the default settings. Depending on size, the save time will vary but I averaged about 8-10 seconds per image save before moving on to the next. Most of the images I tested the software with were in the 5-10MB range. If you choose to fine-tune each edit, which you easily can, you’ll add a few seconds to each edit. On a grander scale, it took me about 20 minutes to go through and sharpen 50 images.
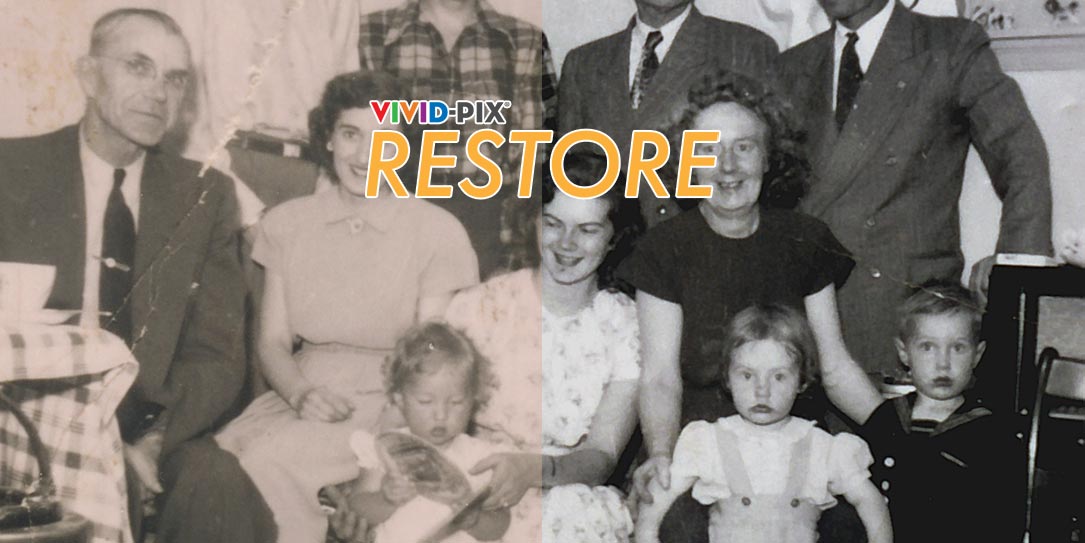
Whether it was a scanned document, old black and white picture, or a digital color image, I was pretty impressed with the default settings and resulting output. If anything, I found it oversharpened a bit in most cases but it was easy to adjust the sharpness down slightly.
Depending on your source image, your results will vary as well. Vivid-Pix RESTORE works with most image types. I was able to successfully load and restore .bmp, .gif, .jpg, .dng, .arw, .png, .tif/tiff, and more.
Sample Restored Images Photo Gallery
NOTE: Most of the edits in the gallery below are program defaults with minor tweaking to sharpening. I didn’t spend a lot of time on them but you really can spend as little or much time as you want tweaking the final image.

.")


.")

Price/Value
Being able to restore old images is pretty priceless, but that doesn’t mean you should have to spend a fortune. Vivid-Pix RESTORE is very affordably priced at US$49.99. Given how quick it is and how well it works on images and documents, if you’re into genealogy or just want to sharpen up some old family photos, this app is well worth the price.
Wrap-up
Vivid-Pix RESTORE does exactly what it says: sharpens and restores old images and documents with ease. It’s super simple to use, preserves the original photo file, and allows for fine-tuning of the final image… all at an affordable price.
In some of our articles and especially in our reviews, you will find Amazon or other affiliate links. As Amazon Associates, we earn from qualifying purchases. Any other purchases you make through these links often result in a small amount being earned for the site and/or our writers. Techaeris often covers brand press releases. Doing this does not constitute an endorsement of any product or service by Techaeris. We provide the press release information for our audience to be informed and make their own decision on a purchase or not. Only our reviews are an endorsement or lack thereof. For more information, you can read our full disclaimer.