
A few years ago, JBL released the Quantum ONE with spatial head tracking for PC gaming. Fast forward and the company has applied that same technology to its latest headset for PC and Xbox.
Estimated reading time: 19 minutes
Our JBL Quantum 910X Wireless review looks at a wireless gaming headset for Xbox and PC (and most other platforms) that features spatial head tracking, signature QUANTUMSound, and more. Read on for our full review!
Table of contents
The Quick Take
Like the JBL Quantum ONE, the Quantum 910X wireless gaming headset for Xbox and PC offers great sound and solid microphone quality for gaming. While the head tracking works great on a PC with the right monitor, it’s somewhat lost on Xbox, regardless of what size screen you are playing on due to the aspect ratio of console games.
Aside from that, this wireless gaming headset is pretty comfortable with its padded headband and memory foam earpads, albeit a tad on the heavy side. It’s stylish, and the gloss finish isn’t for everyone but with the default lighting setup, it really does tie into the Xbox theme of things.
Specifications
The JBL Quantum 910X wireless gaming headset we reviewed has the following features and specifications:
- Gain the competitive advantage with JBL QuantumSPATIAL 360™ on your Xbox
- Be at the center of the game with Hi-Res certified JBL QuantumSOUND Signature
- Low-latency wireless system
- Active Noise Cancelling technology for gaming
- Play and charge at the same time
- JBL Dual Source (Simultaneous USB/Bluetooth connectivity and use)
- Game audio-chat dial
- Flip-up-to-mute boom mic with echo and noise suppression
- Durable, comfortable design
- Optimized for Xbox, compatible with multiple platforms
| Driver size | 50mm |
| Driver sensitivity at 1kHz/1mW | 113 dB SPL @1 kHz / 1 mW |
| Dynamic frequency response range | 20 Hz – 40 kHz (Passive), 20 Hz – 20 kHz (Active) |
| Impedance | 32 ohms |
| Bluetooth version | 5.2 |
| Bluetooth profiles | A2DP 1.3, HFP 1.8 |
| Bluetooth frequency | 2402 MHz – 2483.5 MHz |
| Maximum playtime | GFSK, π/4 DQPSK |
| Bluetooth transmitter power | <13 dBm |
| Maximum play time | 37 hours |
| Charging time (hours from empty) | 3.5 hours |
| Active Noise Cancelling | Yes |
| Built-in Microphone | Yes |
| Wireless | 2.4GHz/Bluetooth |
| Weight | 420g (14.8oz) |
What’s in the box
- JBL Quantum 910X Wireless for Xbox headset
- Calibration Microphone
- USB Charging Cable
- 3.5 mm audio cable
- USB wireless dongle
- USB-A to USB-C Converter
- Windshield foam for microphone
- Carrying pouch
- Quick Start Guide | Warranty card | Safety Sheet

Design
Following in the footsteps of the JBL Quantum ONE gaming headset, the 910X Wireless gaming headset has a quite aggressive gaming look. These wireless over-the-ear headphones are bulky looking but in a good way.
The headband is roughly 1 3/4 inches wide with some detail lines and the JBL logo stamped into it. On the underside, about 3/4-inch of memory foam lines the inside. The center of the underside has a bit of extra memory foam thickness with two smaller areas to the left and right having a little extra cushioning as well. On either end of the headband is the adjustable arms that connect to the earcups.
The earcups are attached to the headband with an inverted Y piece which swivels and tilts. They are pretty glossy, and silver in colour when turned off. The earcups swivel forward a full 90° and back/out roughly 30°. As far as the tilt is concerned, using the top of the earcup as a reference point, they tilt out roughly 10° and in roughly 30°. Between the swivel and tilt, you should get a pretty comfortable fit for your head size and shape.
The outer earcups are adorned with a cog-shaped centerpiece with the JBL logo in the middle, which lights up and is one of three RGB zones. The rest of this centerpiece has thin diagonal lines for added texture. The centerpiece is attached to a much larger and oval-shaped piece. Even though the earcup looks glossy and opaque, the second RGB strip snakes its way around the outside. Flattened at the bottom, the third, and final, RGB zone consists of a series of slanted lights towards the front bottom of the outer ear cup.

The outer edge of the earcups both have an ANC microphone near the back and a braided black wire with green accents connecting from the back top through the headband. The left earcup is where you’ll find most of your onboard controls. Located on the back moving towards the bottom, these include (from top to bottom):
- ANC/Talkthru LED
- ANC/Talkthru button
- Game/chat balance dial
- Volume control wheel
- Microphone mute/unmute button
- Charging LED
- 3.5mm audio jack
- USB Type-C port
On the right earcup are the rest of the controls along the bottom (from back to front):
- Head tracking re-center/sound mode button
- Power/Bluetooth pairing mode slider
- Status LED (Power/2.4GHz/Bluetooth)
Unlike the Quantum ONE, the microphone on the Quantum 910X is not detachable and is attached to the left earcup on a swivel. It is easily bendable for better placement and stays in place fine once adjusted. A windshield foam piece is included to place over the end of the microphone for better microphone audio quality. To mute the microphone, all you need to do is flip it up, parallel to the side of the headband.
Finally, as far as the gaming headset design, the inside of the earcups is lined with faux leather covered memory foam which is quite thick. It is rather comfortable around the ears. On the inside of each earcup is a green L or R on the semi-transparent material to indicate which earcup goes on which ear. With the semi-transparent material used on the inside, you can see the 50mm drivers which is a fun little touch. If you wear glasses, however, they aren’t the most comfortable as the earcups tend to press the arms against the sides of your head.
The JBL Quantum 910X includes two cables. Both are black braided cables with green accents. The first is a USB Type-C to USB-A charging cable. The second is the 3.5mm audio cable for use with game consoles or mobile devices. The 3.5mm cable is about 4 feet in length. It also has an inline control for volume and microphone mute toggling.
Being a wireless gaming headset, a USB-A dongle is also included. It’s about an inch in length, has the JBL logo stamped on one side with an LED below it, and a button switch on the side. When inserted into your system, the LED will turn green (which is what you want for an Xbox). To change it to PC mode, press the button once and the LED should turn white and you’ll be good to go on your desktop or laptop. If you prefer a USB-C connection, JBL also included a USB-A to USB-C adapter.

One thing I noticed about the headset after wearing it for extended gaming sessions is that it is a bit heavier than others I’ve tried in the past and slightly heavier than the wired Quantum ONE model. I’m not into marathon gaming sessions lately and usually average an hour or two per session. Still, at around the two-hour mark, I definitely felt a bit of tension in my neck due to the weight of the headphones.
Ease of Use
JBL recommends fully charging the headset before use. Connecting to an Xbox is super simple. Using the included 2.4GHz USB-A dongle, plug it into a free port on your console, move the power switch to the on position and it should pair and you’re good to go.
When first plugged into a PC, the JBL QuantumENGINE download prompt appears. You’ll want to install this to take full advantage of the JBL Quantum 910X gaming headset. After installation, you’ll need to restart your PC. Once restarted, opening up the QuantumENGINE app will present you with the various configuration options which you can then play with.
Clicking on the QuantumSPHERE 360 audio option will then open your system audio settings and launch a web browser with a YouTube video showing you how to further configure your headphones. It is rather simple, but it is an extra step that needs to be taken.
If the sound properties aren’t open, type Sound into your Windows search bar and select the Change system sounds option. You can also type mmsys. cpl and select the control panel item as well. Next, select the Playback tab and make sure the JBL Quantum 910X* Game is selected as your speakers (not headphones). Next, right-click and select Configure speakers. Choose 7.1 Surround (as it’s likely defaulted to Stereo) and in the next two screens, make sure all 7.1 channels are selected. Click finish. You can then return to the software for further configuration, including HRTF calibration.
Once configured and set up, you can also control certain functions from the left earcup itself. These include being able to toggle ANC on and off, increasing and decreasing master volume, and muting and unmuting the microphone. On the right earcup, you can recenter the head tracking when needed.

When using the headset with another device, like a mobile phone, console, or anything with a 3.5mm audio jack, it’s as simple as using the included 3.5mm audio cable. While we didn’t test it, the manual does indicate that the headset is also compatible with PC/Mac/PS4/Switch Dock with the USB-A dongle, as well as PC/Mac/Switch/PS5/laptop when used with the included USB-C adapter.
Software
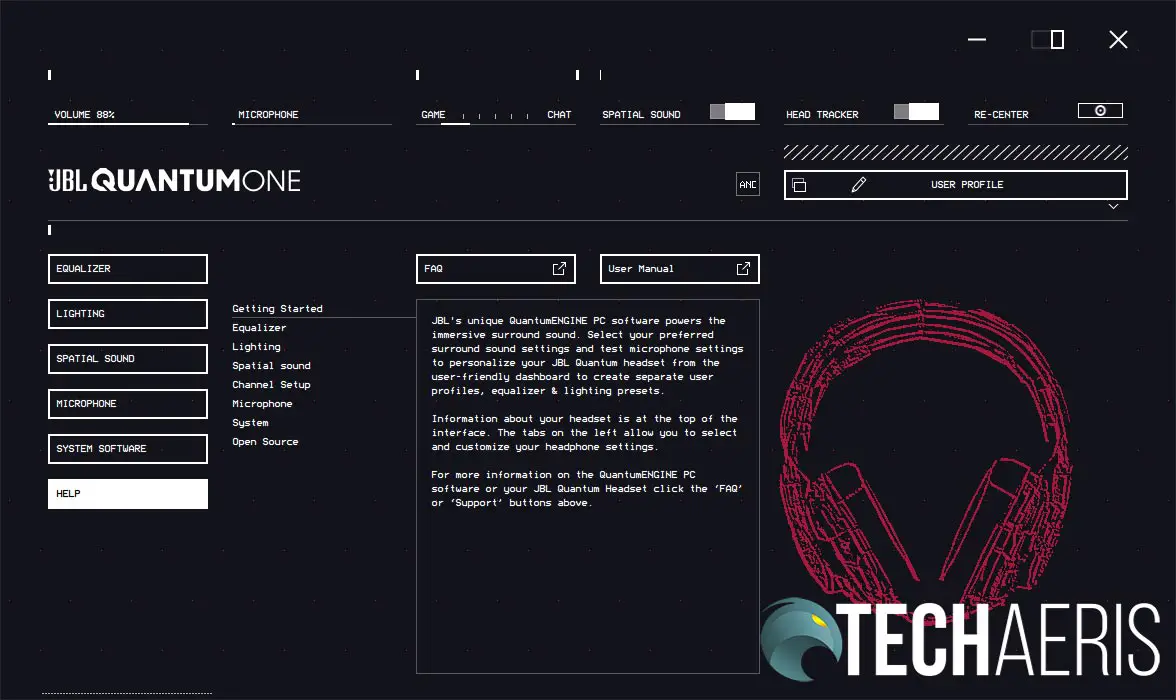
As mentioned above, when you first plug in the JBL Quantum 910X gaming headset to your computer, you are prompted to download the JBL QuantumENGINE Windows application. Like most peripheral device applications, QuantumENGINE lets you adjust the equalizer settings, lighting, spatial sound, microphone, update software/firmware, and even has links to the manual and FAQs.
JBL attempted to make the interface futuristic and trendy and, to be honest, it looks kind of dated. It’s not that it doesn’t work but something just looks and feels off about it. On the home page, you are shown quick settings across the top including volume, microphone activity, battery level, game/chat balance, spatial sound toggle, head tracker toggle, and quick access to re-centering the headset. Just below this on the far right is an option to save or edit the current profile. Underneath this is a red outline of your headset positioning. As you turn your head around, the headset on-screen follows so you can see the orientation.
Along the left side are your rectangular option buttons. From top to bottom, these are Equalizer, Lighting, Spatial Sound, Microphone, System Software, and Help. For Equalizer options, you can choose between Bass Boost, Bass Cut, Clarity, Flat, FPS, High End Boost, or Long Session. In addition, you can copy a preset and then adjust 10 frequency sliders to fine-tune your preferred audio settings.
The Lighting tab lets you toggle the RGB lighting on or off, as well as set the colours for the three different zones. While the default colour scheme screams Xbox, you can easily change this in the app to your favourite colour scheme. Not only can you set the colours but you can select multiple colours for each zone and adjust how long they cycle. It’s a bit clunky to do but once you’ve played with it for a while, it’s not that bad overall.
Spatial Sound is the section you’ll definitely want to hit up. Here you can choose between precise, balanced, or immersive settings for QuantumSPHERE 360. With QuantumSPHERE, you do have to specify your head size which, if you want an accurate sound stage, you’ll want to do. You can choose S/M/L or go into the Advanced Mode and set your height and head diameter. I was skeptical at first but you can notice a slight difference as you adjust both of these. Finally, you can check the channel setup as well as start the HRTF calibration. To do this, plug the included calibration mic into the 3.5mm port on the headset, and place the included calibration mic into your left ear. After it runs a few tests, it will prompt you to move the mic to your right ear. Once done, it will generate an HRTF profile for you and let you compare it to the default settings. Personally, I liked the default settings even after I ran the HRTF calibration twice.

Next, the Microphone tab lets you see the current mic level, set the mic volume, and adjust the sidetone level (off/low/mid/high).
Finally, the System Software and Help sections are pretty self-explanatory. The first allows you to check for QuantumENGINE updates or firmware updates for the headset itself. When I first received the headset, there was a firmware update and it was sent another one recently which I imagine cleared up some of the earlier issues other reviewers encountered.
Even if you’re using the headset exclusively for Xbox gaming, you will want to install the QuantumENGINE software on a computer for configuration and firmware updates.
Sound Quality
Regardless of looks or lighting options, sound and microphone quality need to be top-notch for any gaming headset. With Spatial Sound on, the 50mm dynamic drivers used in the JBL Quantum 910X sound fantastic with its 7.1 Surround Sound soundstage. Positional audio while gaming is fantastic and the audio is pretty balanced across lows, highs, and mids. I liked the Bass Boost EQ setting the best to get that little extra bass out of the headset.
The active noise cancelling works great as well. When turned on, I can barely hear ambient noises around me like the dishwasher or people talking. And that’s with no audio playing through the headset. Once you start gaming or listening to music, all outside sounds are easily drowned out. I played several games with the headset including Forza Horizon 5, Gears 5, Call of Duty: Warzone 2, Heroes of the Storm, and Diablo IV. In all cases, the sound stage was amplified with the sounds of roaring cars coming from all directions, or battlefield sounds having a more precise location. The location aspect especially came in handy for Warzone 2.0 and Gears 5. There were a couple of times when I wanted to turn my head around to see who was coming. Funny enough, when I did, the audio from behind me moved toward my right ear because I had the head tracker feature turned on.
Head tracking. While we were at CES a few years ago, we had a quick demo of the feature. And it blew me away personally. Sitting in a chair, staring at a huge screen, and as you turn your head, the sound in front of you stays located in its position. Put another way, if someone is shooting at you from directly in front of you and you turn your head to the left, the gunfire moves more toward your right ear. Turn your head right and the gunfire fills your left ear. Turn around completely and the gunfire moves behind you. In other words, the in-game and computer audio stays in place in relation to the events on the screen and not the position of your head, just like it would in real life.
So here’s the thing. While the headset sounds great with 7.1 surround sound audio and the head tracking positional audio works as advertised, it’s best suited for large monitors. I tested the Quantum 910X on a 16-inch laptop, a 48-inch 4K monitor, the whopping 49-inch Samsung Odyssey Neo G9, and, of course, an Xbox Series X on a 106″ projector screen.

On the laptop, you’re not moving your head that much so the head tracking doesn’t come into play. When you have a second monitor setup, you can hear the audio staying centered on the main screen but no one is really gaming that way. On the 48-inch 4K monitor, the same thing pretty much applied but the head tracking did come into play slightly due to how close I was sitting to the monitor and only when looking towards the edges or corners.
However, the JBL Quantum 910X really shone with the 49-inch Samsung Odyssey G9. Every game I played on that beast with its 1000R curvature and 5120 x 1440 benefited from the head tracking including Call of Duty: Warzone 2 and Diablo IV. Due to the size of the monitor, which is immersive enough visually, I was constantly scanning left and right depending on the game I was playing. With shooters, it does make a difference when you hear footsteps behind you and you turn your head to the left and you can hear them filling your left ear, confirming a more precise location. Not only during gameplay but cutscenes are much better when you can turn your head to look at something in the upper corner and the audio stays centered on the screen. At first, it was actually kind of trippy because it does mimic real life.
Based on my previous experiences with the Quantum ONE, and my confirmed testing with the 910X, I didn’t have high hopes when testing it on the Xbox Series X and my 106″ projection screen. As such, I wasn’t disappointed to find that the head tracking, as I expected, is mostly lost here as well. Even though it’s a larger screen, the head tracking feature was very minimal when looking toward the corners of the screen. That being said, most of the time when I do game and look around, I’m mostly moving my eyes and very rarely my head. While you can hook a Series X up to a gaming monitor, you’re still going to be stuck in a 16:9 aspect ratio, regardless of your monitor. As such, if you do notice the head tracking, it’s pretty minimal.
During my review period, there was only one instance when I had to re-center the head tracking. There are two ways to do this. The first, and more accurate, is through the app. Of course, mid-game you’re not going to do this. The second, and easier, way is by looking at the center of your monitor and pressing the re-center button on the left earcup. The voice prompt will indicate it’s recentering and then confirm when your headset is centered again.
In summary, the 7.1 surround sound Spatial Audio while PC gaming with the JBL Quantum 910X is absolutely fantastic — especially if you have a larger monitor and can enjoy the head tracking feature as well. Unfortunately, head tracking is mostly lost on other systems, including the Xbox Series X on a large projection screen but in those cases, the audio was decent and balanced enough.
Microphone Quality
Unlike the Quantum ONE at launch, the microphone quality was pretty solid when gaming on PC or the Xbox. When asked, the other people in my group said I sounded just fine and was coming through nice and clear. One thing to note, however, when sidetone is enabled, you do lose the ANC functionality. It’s not the end of the world and didn’t make a huge difference given I tend to game in a room alone, but if you are in a busier location or trying to tune out background noise, it might be a minor issue.

Battery Life
JBL claims the Quantum 910X Wireless gets up to 37 hours of playback. During my time testing it, I did get just under 40 hours while using it between both the PC and Xbox Series X with the Spatial Audio and head-tracking enabled. For the most part, my volume was set to about 50% so if you do have it cranked higher, you’ll likely see lower battery life.
Once depleted, it does take about 3.5 hours to recharge the headset.
Price/Value
With an MSRP of $299.99, the JBL Quantum 910X Wireless gaming headset for Xbox isn’t exactly cheap. That being said, it does offer solid audio and pretty decent comfort. As mentioned above, the head tracking feature is lost when playing on the Xbox due to the aspect ratio.
At the time of this review, however, it is selling on Amazon and the JBL website for $179.95 which is an excellent price for the value. At regular price, this section scores an 8/10, at the sale price, it’s an easy 9 or 9.5/10.
Photo Gallery


Wrap-up
The JBL Quantum 910X is a great sounding 7.1 surround sound gaming headset. The head tracking feature works great if you have a large monitor to make it a worthwhile feature for PC gaming. Unfortunately, that same feature is lost when it comes to Xbox gaming. There are other tradeoffs as well, as it is on the expensive side (at regular price), is a bit heavy, and you lose ANC with the microphone sidetone turned on, which may bug some gamers. If you can get it on sale, it’s a solid deal for a wireless gaming headset with a dongle that makes it easy to use on your Xbox console, PC, or other gaming system.
JBL Quantum 910X Wireless
$299.95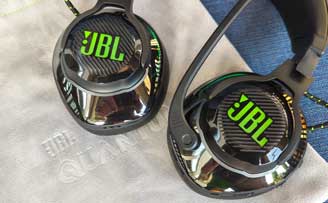

Nailed it
- Clear gaming headphone design with default Xbox green LEDs
- Excellent sound quality
- Head-tracking is great for PC gaming with certain monitors
- Fairly comfortable headband and ear cushions
- ANC and Talkthru work great
- Pretty decent microphone quality
- Plenty of equalizer options
- Can be used on almost any system (PC, Mac, Xbox, PS, Switch, laptop, mobile)
- USB-A and USB-C dongle option included
Needs work
- Reverts to console mode every time you remove dongle
- Need PC for configuration software
- Headtracking not really useful for Xbox gaming
- No Xbox app
- Bit heavier after extended gaming sessions
- Lose ANC when microphone sidetone enabled
- Expensive at regular price
In some of our articles and especially in our reviews, you will find Amazon or other affiliate links. As Amazon Associates, we earn from qualifying purchases. Any other purchases you make through these links often result in a small amount being earned for the site and/or our writers. Techaeris often covers brand press releases. Doing this does not constitute an endorsement of any product or service by Techaeris. We provide the press release information for our audience to be informed and make their own decision on a purchase or not. Only our reviews are an endorsement or lack thereof. For more information, you can read our full disclaimer.
Last Updated on March 13, 2024.


