It’s been almost 4 years since I put a home theatre complete with 3D projector in my basement and I haven’t looked back. As you can imagine, I jumped at the chance to review one of Acer’s new short throw DLP projectors. Find out what I thought in our Acer H7550ST review.
Specs
The Acer H7550ST is a short throw DLP projector and has the following specifications:
- Min/Max Lens Aperture: F/2.6 to F/2.78
- Min/Max Focal Length: 10.20mm to 11.22mm
- Min/Max Diagonal Image Size: 54″ to 25′
- Min/Max Projection Distance: 35.43″ to 15.09′
- Optical/Digital Zoom: 1.1x/2x
- Lamp Type: OSRAM
- Lamp Power: 210W
- Normal/Economy/ExtremeEco Lamp Life: 4000/6000/8000 hours
- Min/Max Vertical Sync: 24Hz – 120Hz
- Min/Max Horizontal Sync: 15 kHz to 100kHz
- Colors Supported: 1.07 billion (30-bit)
- Brightness: 3000 Lumens
- Native/Max Resolution: 1920×1080/1920×1200
- Native Aspect Ratio: 16×9
- Compatible Aspect Ratio: 4×3
- Contrast Ratio: 16,000:1
- Throw Ratio: 0.69 to 0.76:1
- Vertical Keystone Correction: -40°/+40°
- Speakers: 2x10W Stereo
- 3 HDMI ports, 1 USB, 1 Composite Video, 1 Component Video, 1 S-Video
- 3D capable, 2D to 3D conversion
- Operating Power Consumption: 399W
- Weight: 7.5lbs
- Fan Noise: 30dB Approximate Economy Mode; 33dB Approximate Standard Mode
In the box:
- H7550ST DLP Projector
- Battery for remote control
- Security Card (contains a unique 6 digit password in case you ever forget the administrator password you set on the projector)
- User’s Guide (CD-ROM)
- Quick Start Guide
- Remote Control
- VGA Cable
- AC Power Cord
- Carrying Case
- 3D Glasses (x2)
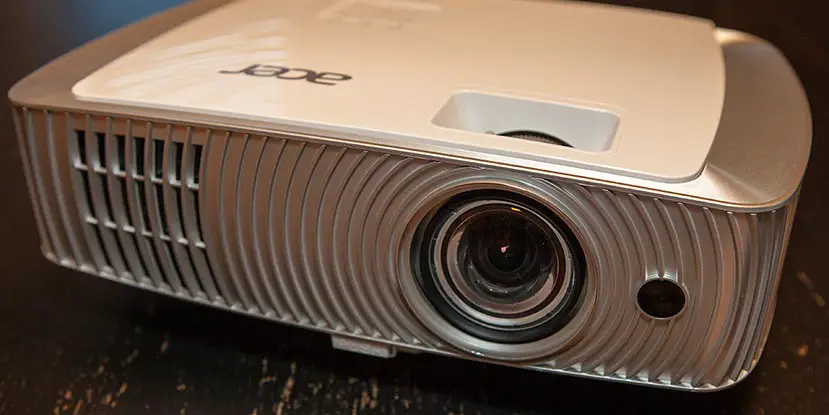
Design
The Acer H7550ST is a white projector with silver front and side accents. The control panel on the top of the projector features the power, lamp, and temperature indicators, the power button, controls for resyncing, selecting a source (RGB, component video, S-Video, composite video, HDMI (MHL), or HDTV), choosing a display mode, keystone adjustments, OSD (onscreen display) menu, and directional selection keys. The focus and zoom rings are also on the top.

The front of the projector contains the lens and the remote control receiver, while at the bottom center is the “elevator button” which allows you to raise the front. One of the feet on the bottom near the back also adjusts allowing you to level out the projector if need be.

The back of the projector contains all the available ports and includes:
- RS232 connector
- HDMI (MHL)
- HDMI
- Mini USB connector
- S-Video input
- Composite video input connector
- Analog RGB signal/HDTV/component video input connector
- Component video inputs
- Audio input/output
- Power socket
- DC 5V output
- Monitor loop-through output
- Kensington™ lock port
The projector was very easy to adjust to the proper height and level, as well as connect the appropriate devices to the proper input.

For those wishing to ceiling mount it, the bottom of the projector has one large and three smaller screw mount holes which should fit most universal ceiling mounts.
Display
My current projector, the Epson PowerLite Home Cinema 3010, has been a great projector for the past few years. I have it set up optimally at 128″ away from my 106″ fixed wall screen. The Acer H7550ST on the other hand sits a mere 65″ away from the fixed screen to give the same 106″ image. My Epson 3010 has a brightness of 2200 Lumens, while the Acer H7550ST has a brightness of 3000 Lumens. While the Acer is brighter when placed at the same distance, it does seem quite a bit brighter once you move it closer to the screen.
The 1080p display on the Acer is crisp and clear, and the colors are nice and vivid thanks to the Acer ColorBoost technology. There are various display options you can set as well depending on your viewing area or content and include:
- Bright: for brightness optimization
- Standard: for most common environments
- Movie: for brighter image and general movie, video, and photo viewing
- Dark Cinema: for dark movie content
- Game: for gaming
- Sport: for sports
- User: define your own settings
You can also set the color of your wall if you are projecting onto it and color choices include white, light yellow, light blue, pink, and dark green. When selected, the projector will correct the image tone to compensate for the wall color to give a more proper color projection. You can also manually adjust brightness, contrast, saturation, tint, color temperature, gamma, and even advanced color management to set individual hue, saturation, gain, white peaking, and more. The Dynamic Black feature causes the projector to dynamically adjust the power consumption according to the brightness of the image being projected.
As previously mentioned, the projected image – whether it be movies, TV shows, games, or photos – displayed great on my fixed high-contrast 0.8 gain grey projector screen.
The “Rainbow Effect”
Unfortunately the Acer H7550ST is a single-chip DLP projector and as a result suffers from what is called the “Rainbow Effect.” This isn’t something that affects everyone, but if you are shopping for a projector I would urge you to test it out in action at a store somewhere and see if you notice what I am about to describe. It’s most noticeable with high contrast scenes or white text on a dark background and can be compounded by moving your head around while focused on a particular word or light colored spot on the screen.
In order to understand the “rainbow effect,” we should take a quick look at how a single chip DLP projector works:
In a projector with a single DLP chip, colors are produced either by placing a color wheel between a white lamp and the DLP chip or by using individual light sources to produce the primary colors, LEDs or lasers for example. The color wheel is divided into multiple sectors: the primary additive colors: red, green, and blue, and in many cases white (clear). Newer systems substitute the primary subtractive colors cyan, magenta, and yellow for white. The use of the subtractive colors is part of the newer color performance system called BrilliantColor which processes the additive colors along with the subtractive colors to create a broader spectrum of possible color combinations on the screen.
The DLP chip is synchronized with the rotating motion of the color wheel so that the green component is displayed on the DMD when the green section of the color wheel is in front of the lamp. The same is true for the red, blue and other sections. The colors are thus displayed sequentially at a sufficiently high rate that the observer sees a composite “full color” image. In early models, this was one rotation per frame. Now, most systems operate at up to 10x the frame rate. (via Wikipedia)
So how does this cause a “rainbow effect?” Again from Wikipedia:
DLP projectors utilizing a mechanical spinning color wheel may exhibit an anomaly known as the “rainbow effect.” This is best described as brief flashes of perceived red, blue, and green “shadows” observed most often when the projected content features high contrast areas of moving bright or white objects on a mostly dark or black background. The scrolling end credits of many movies are a common example, and also in animations where moving objects are surrounded by a thick black outline. Brief visible separation of the colours can also be apparent when the viewer moves their eyes quickly across the projected image. Some people perceive these rainbow artifacts frequently, while others may never see them at all.
This effect is caused by the way the eye follows a moving object on the projection. When an object on the screen moves, the eye will follow the object with a constant motion, but the projector will display each alternating color of the frame at the same location, for the duration of the whole frame. So, while the eye is moving, it will see a frame of a specific color (red for example). Then, when the next color is displayed (green for example), although it gets displayed at the same location overlapping the previous color, the eye will have moved toward the object’s next frame target. Thus, the eye will see that specific frame color slightly shifted. Then, the third color gets displayed (blue for example), and the eye will see that frame’s color slightly shifted again. This effect is not perceived only for the moving object, but the whole picture.
Additionally, multi-color LED-based and laser-based single-chip projectors are able to eliminate the spinning wheel and minimize the rainbow effect since the pulse rate of LEDs and laser are not limited by physical motion. “Three-chip DLP projectors have no color wheels, and thus do not manifest this [rainbow] artifact.”
(via Wikipedia)
In short, the spinning color wheel causes a slight color shift as it rotates which is visible to some people – but not all. Unfortunately both my wife and I can see it and while it doesn’t make watching shows and movies on the projector unbearable, it is definitely noticeable. In some cases, for example when browsing videos on my Xbox One via the Media Player which has white text on a black background it is really noticeable and at this point does become somewhat of a nuisance.
While playing games and watching TV/movies, the “rainbow effect” wasn’t noticeable that often, and when it was it was for a brief second or two but it is something that you should definitely keep an eye out for when considering a projector. As mentioned on Wikipedia, this only affects single chip DLP projectors of which the Acer H755oST is one.
As you’ll see from my rating below I’m not docking points for the “rainbow effect” as it is not something that affects everyone, and when it’s not noticeable the display is fantastic in all aspects from crispness to color and contrast.
Speakers
For the most part I used the Acer H7550ST using my home theatre receiver and speakers, but I did test it with the onboard speakers and my laptop. The dual DTS sound effect 10W stereo speakers are decent enough, and while I wouldn’t personally use them for an extended period of time they are adequate enough for use in smaller rooms or during presentations where a speaker system is unavailable. The DTS option can be disabled to allow for basic treble and bass adjustments, and there is also a volume boost option.
Should you choose, you can also pair it with a Bluetooth speaker giving you plenty of options for portable sound.
Performance
The Acer H7550ST was easy to set up using the OSD installation menu. The projector ran great and is also fairly quiet. I could barely hear it sitting about 5′ away. I had it set up (sitting on a table) and was sitting about 5′ behind it, and even though the remote receiver is on the front of the projector I had no issues with any of the remote functionality.
If you have your smartphone or tablet connected via the HDMI/MHL connection, you can use some of the buttons on the remote control to control it. Unfortunately even though an HDMI/MHL cable was included the Nexus 5 doesn’t support MHL so I wasn’t able to test this feature out.
Gaming
At least half my projector time is spent gaming on the Xbox One. One complaint some people have with gaming and projectors is visual lag, and I honestly didn’t notice anything out of the ordinary while playing a variety of games using the projector including Forza Horizon 2, The Witcher 3, Gears of War Ultimate Edition Beta, Batman: Arkham Knight, World of Tanks, and various ID@Xbox indie puzzle games. I only mention the titles played to show the various types of games that I tested with the projector.
3D
Having a 3D projector, I have quite a few 3D Blu-ray discs on hand. Of course the first I fired up was the family favourite – Avatar 3D. As expected, the image is somewhat darker when the 3D function of the projector is enabled, but it was only slightly darker than normal viewing and didn’t detract from the experience at all. As with 2D viewing, the 3D movie looked fantastic, sharp, crisp, and the colors were great.
The 3D glasses provided are comfortable and actually somewhat stylish. I wear glasses and my biggest complaint about 3D glasses are how awkward some of them are to wear with prescription glasses but the Acer 3D glasses fit very comfortably over mine and didn’t bother me at all while wearing them.

2D to 3D conversion
Now for the fun part. I’ve had some past experience with TVs that have a 2D to 3D conversion feature in which they’ll take any movie or show and turn it into a 3D experience. The results have usually been mixed but I still couldn’t wait to test this out on the Acer H7550ST.
First up, I tossed in one of my favourite movies that I thought would translate well into 3D. And was I right, Sucker Punch looked absolutely fantastic using the 2D to 3D conversion – in fact I was outright impressed with how well the conversion mode worked. Next up I tried Transformers: Dark of the Moon as I have the 3D/2D Blu-ray combo pack. I watched a bit using the native 3D disc and then switched it out for the 2D disc and enabled the conversion and watched the same bit. While the 3D version did look better (as I expected), the 2D to 3D conversion held up and did a fair job on its own. Unless watching them back to back like I did you’d probably be satisfied with the result.
Finally, I couldn’t help it and fired up Forza Horizon 2. It’s one of my favourite games to play on the big screen, especially in cockpit view. On went the 3D glasses, on went the 2D to 3D conversion and away I went. I’ve had previous experience with 3D gaming – Batman: Arkham City was one that supported it on the Xbox 360. While the 3D gaming experience is great, and Forza Horizon 2 looked absolutely fantastic in 3D with the conversion, I can only play about an hour before starting to get a headache which I suspect is due to sensory overload coupled with the critical thinking that’s required during gameplay. Sensory overload aside, it was a lot of fun to be able to play in 3D and as mentioned the conversion was great and the depth in the car, other vehicles, and the track definitely enhanced the gaming experience.
I used the default 2D to 3D conversion mode and was pleased with the results in all the cases above. There were a couple of TV shows that didn’t look quite right but the projector gives you the ability to set the convergence and depth settings on the conversion mode and with a little playing around I was able to get a setting that provided a more suitable 3D image.
Power
The projector also features Dynamic Black and ExtremeEco functions which help decrease the amount of power used and helps extend the lamp life. As previously mentioned, when using the Dynamic Black mode, the projector will adjust power consumption based on the brightness of the image – the darker the image, the less power used while image contrast is enhanced. When the ExtremeEco function is enabled, the projector will decrease power consumption by up to 70% if no input signal is detected for 5 minutes.
Remote
The functions on the remote and the buttons on the projector provided easy access to all the available functionality. The 3D button on the remote allows quick access to the 3D menu which allows you to set up native 3D or 2D to 3D conversion on the fly.
Accessories
The projector included a host of accessories (as mentioned under the Specifications above). Interestingly enough while it included a VGA cable, it didn’t include an HDMI cable in the box. Acer also offers an optional Wireless HD Kit and an optional carrying case.
WirelessHD Dongle Kit
Acer also sent along their optional WirelessHD Dongle Kit which allows you to plug a wireless receiver into one of the projector’s HDMI ports, and plug your laptop or other device into the wireless HDMI adapter to wirelessly transmit your video and audio signal to the projector. The adapter is a small box and requires plugging into a power source and can get a bit warm after extended use. Overall though, the wireless adapter/receiver works great and I didn’t notice any issues with video or audio when wirelessly streaming from my laptop.
The WirelessHD kit came with both an HDMI and an HDMI/MHL cable so everything you need is available straight out of the box. One of the nice features about the wireless receiver is that it is HDMI powered and doesn’t need external or USB power. In addition, it comes with a universal power plug with attachments for various countries.

Carrying Case
The optional carrying case is a must have if you are planning on transporting the projector anywhere. The case is constructed of a canvas material with hard sides. The front and back of the case however aren’t reinforced so some care will need to be taken when using it. The inside has a strap to hold the projector in place and the front contains a pouch for easy storage of power cords and other accessories.

Price/Value
Coming in around $1000 USD, the Acer H7550ST is not only a great projector for home use but could also be used in a board room or other similar setting. Because of its short throw range, it can be used in a variety of smaller rooms where a regular projector would have issues. For the price, if you’re looking for an affordable 3D projector for either use the Acer H7550ST is definitely worth looking at.
Wrap Up
With great performance, 3D and 2D to 3D conversion, short throw distance, and quiet fan, the Acer H7550ST is a great affordable 3D projector for either home or business use. Coupled with the optional Wireless HD receiver, this projector should be able to play content from almost any device you can think of.
[rwp-review id=”0″]*We were sent a demo unit of the Acer H7550ST projector for the purposes of this review.
Last Updated on January 12, 2019.