
It looks like wireless charging for smartphones is here to stay. On that note, so is hands-free smartphone usage, especially with programs like Android Auto and Google Maps. Our Lynktec Bolt review takes a look at a smart car mount with Qi wireless charging for your wireless-charging equipped smartphone.
Specifications
The Lynktec Bolt Smart Car Mount & Qi Wireless Charger has the following features and specifications:
- Automatic lock & unlock with one touch release
- Qi-certified fast wireless charger (supports WPC Qi wireless charging protocol)
- Adjustable stand for 4″ to 6.7″ devices
- Rotates from portrait to landscape mode
- 250 mAh backup battery operates mount when disconnected from
power - Includes air vent holder, charging cable, and dual USB car charger with Quick Charge 3.0 and 2.1A outputs
- Dash & Windshield Mount sold separately
- Wired input: 9V/2A, 5V/2A
- Wireless output: 9V/1.12A, 9V/0.83A, 5V/1A
- Operating temperature: 14° to 140°F (-10° to 60°C)
- Charging power: 10W (max), 7.5W for iPhone X/8/8 Plus, 5W
- Charging efficiency: 60-75%
- Over temperature protection: if the temperature of Bolt rises above 140°F/60°C while charging, it will automatically stop charging and resume once temperatures drop below 131°F/55°C
- Overvoltage protection: If the input voltage is greater than 10V while charging, Bolt will automatically stop charging
What’s in the box
- Bolt Car Mount
- Air Vent Holder
- USB-C to USB Cable
- Dual USB Car Charger
- User Manual

Design
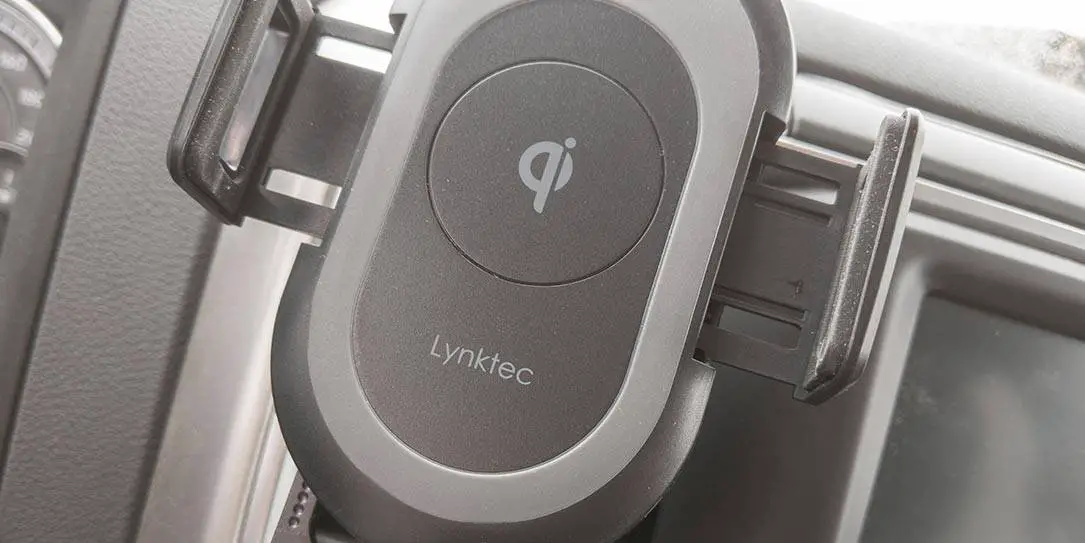
The Lynktec Bolt Smart Car Mount & Qi Wireless Charger comes in three main pieces, plus a USB-C charging cable. The main component, of course, is the Bolt Car Mount. Ovalish in shape, the charging mount is about 4 1/2-inches by 2 1/2-inches and 3/4-inch thick. The front of the car mount has an infrared sensor near the top, a wireless charging area with the Qi-charging logo in the middle, and the Lynktec wordmark near the bottom.
On either side of the
Under the arms and above the feet on the left side is a power indicator LED. In the same position on the right side is a wireless charging indicator. A physical power button is located on the upper right corner. Finally, the One Touch Unlock Sensor is located on the back top of the car mount.

Flipping the car mount over, you’ll find a removable cap ring which screws onto the vent holder or dash or windshield holder nub.
The included vent holder has a base roughly 1 1/2-inches wide and 1 1/4-inches tall. Two vent clips protrude out the back by about 3/4 of an inch and are opened by way of a button and spring assembly located on the top edge of the vent holder. Finally, the front of the vent holder has a ball-shaped nub which fits into the receptacle on the car mount.

The third component is the included dual USB-A car charger. It’s pretty standard as far as DC car adapters go and has a nice soft black finish. The Lynktec wordmark is printed in white on the side which, of course, can’t be seen when plugged in. The face of the charger is the important part and comes with two USB-A ports. The top, indicated with an orange insert, supports the Qualcomm Quick Charge 3.0 specification. The bottom, indicated with a black insert, is marked for 2.1A output.
Finally, the included USB-C to USB-A cable is nicely braided and about 40-inches in length. Depending on your set up, it’ll be a bit long but the extra length is indeed nice just in case, not to mention the braided finish.
Installation/Assembly
Assembly and installation is pretty simple. Simply remove the ring cap and place it over the round nub on the air vent holder (or dash/windshield mount). Next, press the air vent holder into the hole on the back of the car mount. Once in place, tighten the cap by turning it clockwise.
Once the car mount is attached to the air vent holder, press the button on the top of the holder to open the clip arms, push it in place on your vent, and release the button. The clip arms will then clamp on one of the vent fins and the car mount will be secured in place.

I’m not a huge fan of vent mounts in the past as I found they tend to flop down. In this case, however, I was pleasantly surprised
After you’ve secured the vent holder (or dash mount), simply plug the included USB-C cord into the bottom of the car mount with the USB-A end into one of the two ports in the car charger. Plug the car charger in to your DC (what used to be a cigarette lighter) port and you’re good to go.
Ease of Use
Once you’re all set up, simply start your vehicle, press the power button, and the mount will turn on. After initially turning it on, you shouldn’t have to turn it on for subsequent uses.
And here’s where the “smart” part comes in. Lightly touch the one touch sensor and the extendable arms will open. As an aside, and because I used this in winter, the

To remove your phone, simply tap the one touch sensor and the arms will open, allowing you to access your phone. You can do this before or after you turn off your vehicle as the car mount also has a 250 mAh backup
As mentioned above, there are power and a wireless charging indicator lights on the mount. The power indicator (on the lower left side) is blue when the unit is fully charged, blinks slowly when it is charging, blinks fast if it’s low on power, and fades in and out when you are powering it on.
The wireless charging indicator light is solid green when charging and blinking green when there is some sort of error. It turns red when it is in standby mode and there’s no phone charging on it and, finally, turns blue when your phone is fully charged.
Lastly, you can turn off the car mount completely by pressing and holding the power button for about 3 seconds — although I’m not sure why you would want to.
Performance
As far as performance is concerned, we did have mixed results depending on what device we used. Initially, the car dock wouldn’t wirelessly charge the Pixel 3 inside a case. Upon removing the case, the phone did start to charge wirelessly. After putting the phone back in the case, I moved the feet all the way down and the phone started charging. As you can tell, the point of this little exercise goes to show that you may need to adjust the feet in order for the wireless charging area on the car mount to line up with the wireless charging region on your smartphone. On that note, while charging the Pixel 3, it indicated it was charging slowly, but it still charged and was sufficient enough to charge the phone while using Android Auto.
We also tested it with the Mate 20 Pro and found it to charge slightly faster, as best as we could tell. The reason for this, unfortunately, is that the Pixel 3 only fast charges on Google-approved devices due to its proprietary charging format. So, in the case of the Pixel 3, you’re limited at 5W while the Mate 20 Pro will get the full 10W the car mount can output.
We had the (un)fortunate opportunity to test this out over the winter months and were able to test it’s temperature range limits. Rated for 14° to 140°F (-10° to 60°C), I found that once it hit below -15°C, the arms wouldn’t open when the sensory was touched. Once my truck warmed up on the inside for about 15 minutes or so, the unit did kick in again and the arms opened as expected. Granted, I do park outside, but it is something to keep in mind if you’re in an area that suffers the cold over the winter months. If you park in a garage, you should be fine but you’ll still have instances where you’re parking outside for periods of time and you may run into this issue as well should the temperature drop low enough.
Accessories
While the base version comes with a vent mount, you can also order a Dash & Windshield Mount mount for US$9.99. Starting from the base, the extension arm has a 2 1/2-inch sticky suction cup with a little tab sticking out to assist with removal. Just above this is the main base to which the arm is attached. Inside the base is a clip that you pull down towards the bottom of the base to tighten the suction once mounted.
The actual arm is attached to the base by way of an adjustable knob which allows the arm to rotate up to 270 degrees, making it suitable for dash or windshield mounting. The arm itself is about 1 1/4-inches wide, 3/4-inch thick, and three inches in length when retracted. The Lynktec wordmark is printed on the top part of the arm, assuming mounting on a dashboard. At the end of the arm is the same type of ball nub to which the charging pad attaches to.

Another knob sits on the underside of the arm and allows you to adjust the length of the arm another two inches to about five inches in total length. Given the adjustability options in both angle and arm length, you should be able to find a suitable location for the mount in your vehicle.
As far as performance is concerned, this thing sticks like nobody’s business. I mounted it in early November before the temperature dropped. I’ve had other car mounts that pop off in warmer or even colder weather but not the Lynktec. Regardless of temperature or road roughness, the dashboard mount stuck firmly and after a
If the included vent mount isn’t for you, the optional dashboard mount should do the trick. Personally, it’d be nice to see a package that either includes both or offers up a choice between the vent or dash mount with the charging pad.
Price/Value
With an MSRP of US$49.99, the Bolt Smart Car Mount & Qi Wireless Charger is pretty reasonably priced given the quality, design, and performance. However, it’ll cost you another $10 if you want the dash/windshield mount, which, although a bit of a pain that it isn’t included, is reasonable as well.


Wrap-up
With wireless charging here to stay and the need for car docks for hands free smartphone use while driving to comply with local laws, the Lynktec Bolt Smart Car Mount & Qi Wireless Charger is a great option for your wireless-charging enabled smartphone.
*We were sent a sample of the Lynktec Bolt Smart Car Mount & Qi Wireless Charger and optional Dash & Windshield Mount for the purposes of this review. In some of our articles and especially in our reviews, you will find Amazon or other affiliate links. Running a website does take money, along with time. Any purchases you make through these links often result in a small amount being earned for the site and/or our writers.
Last Updated on February 3, 2021.