
Thermostats are a necessity in any house. Over the past few years, many companies have released smart thermostats that allow you to set and control your heating and cooling from your smartphone. Google is one of those companies and recently released a new version of their smart thermostat.
Our Google Nest Thermostat review looks at a smart thermostat that allows you to set schedules, adjusts automatically based on detecting if anyone is home or not, and much more. Read on for our full review!
Specifications
The Google Nest Thermostat has the following features and specifications:
| Display | 2.4-inch QVGA IPS liquid crystal display (240 x 320 pixels) with digital brightness enhancement film and mirrored glass lens |
| Sensors | Motion, temperature, humidity, capacitive touch, ambient light |
| Power | Primary: From HVAC system wires Battery backup: 2 AAA 1.5V alkaline batteries Power consumption: Less than 1kWh/month |
| Connectivity | 802.11b/g/n 2.4 GHz, 802.11a/n 5 GHz Wi-Fi |
| Compatibility | Works with 85% of 24V systems |
| Multi-zone Control | One thermostat per zone |
| Voice Control | Works with Hey Google and Alexa |
| Sustainability | All plastic components are made with 49% post-consumer recycled materials |
| Languages | English, French, Spanish |
| Accessories | Trim Kit covers cosmetic wall imperfections that may be left behind when an old thermostat is removed (sold separately) |
| Colors | Snow, Sand, Fog, Charcoal |
| Dimensions | 84 x 84 x 27.25mm (3.3 x 3.3 x 1.07in) |
| Weight | 139g (4.9oz) |
What’s in the box
- Thermostat display
- Base
- Mounting screws and labels
- Quick start card
- Welcome guide
- Safety and warranty

Design
Round in design, the Google Nest Thermostat is 3.3-inches in diameter and 1.07-inches in depth. Mostly plastic in construction, Google points out that all plastic components are made with 49% post-consumer recycled materials. The entire front face has a black glass finish with a skinny lip around the outer edge. The sides of the thermostat curve inwards and are a solid white, charcoal, sand, or fog (mint green) colour.
The thermostat’s back has two battery slots for the included rechargeable batteries and six pins to connect to the backplate. The backplate has a level to assist with installation and two pairs of connector plates with Y/C/W on the left and G/R/*OB on the right.
There are no physical buttons on the Google Nest Thermostat. Rather, the right side is touch-sensitive, and you can use this to adjust the temperature or access the settings when needed.
Display
The Google Nest Thermostat has a 2.4-inch QVGA IPS liquid crystal display. IT has a resolution of 240 x 320 pixels, digital brightness enhancement film, and a mirrored glass lens. Unfortunately, it is not a touch screen design, and every once in a while, I still try to tap the screen to get into the menus.

The display is crisp and clear; however, you can see the 2.4-inch square display panel under the round mirrored glass lens. It’s not the end of the world, but it would have been nice for the display to look more seamless.
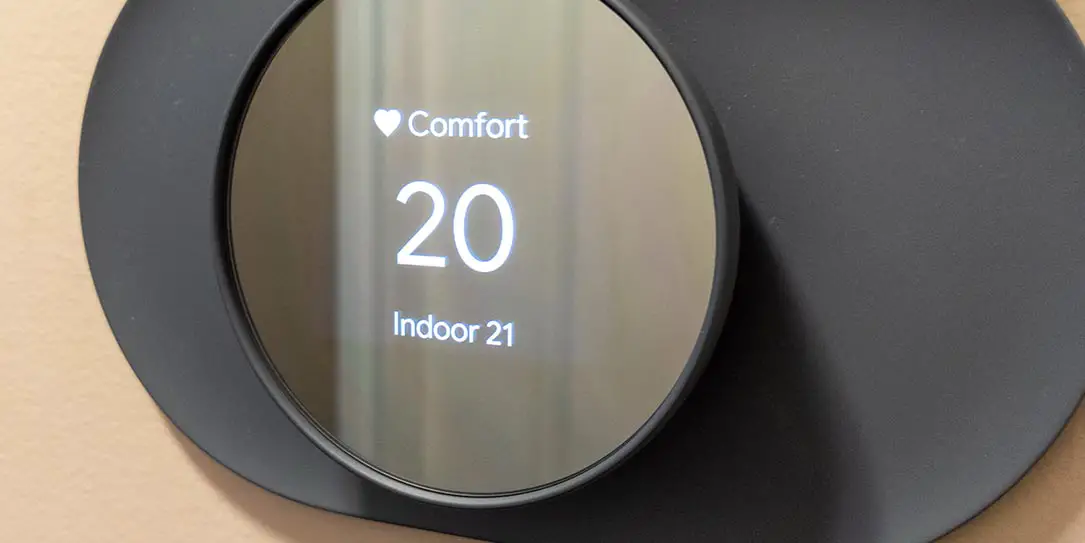
The thermostat can be set up for the screen to turn on when you walk by or not until you touch the side panel. The home screen displays your current preset on the top, the current temperature setting in the middle, and the current indoor temperature.
Installation
Before you even think about getting a Google Nest Thermostat, you’ll need to check your compatibility on the Nest website. The Google Nest Thermostat only took about 15 minutes to install, given I already had an ecobee, and the wiring plate swap was simple. If you’re unsure about anything, be sure to call a licensed electrician to assist with your installation.
After turning off the thermostat’s power, I removed the existing ecobee thermostat I had previously installed. Next, I placed the optional Nest Thermostat Trim Kit plate (more below) against the wall with the Google Nest Thermostat’s backplate against it. During this step, I fed the four wires through the cutout in the center of both plates. Once centred by using the level on the backplate, I screwed it in place using two screws. Next, I connected the four wires to the corresponding letters as they were connected on the ecobee. For the most part, the wire colours matched the letters: red to R, green to G, and white to W, except the orange wire going to C.

Once wired, I turned the power back on. Finally, snap the Google Nest Thermostat display into place, connecting the six pins on the back of the display piece with the holes in the backplate. Once it powers up, you continue the setup in the Google Home app on your Android or iOS device.
Setup on the Google Home app takes a few minutes but is pretty self-explanatory. It consists of the following steps:
- Add and manage > Set up device
- Choose a home
- Select Nest Thermostat from the list of devices
- Migrate your Nest account if you have one
- Agree to the terms
- Create a new Nest network (if this is your first Nest device) or join an existing Nest network (if you already have a Nest device)
- Make sure you Nest Thermostat is installed and on at this point
- Select the wires you have connected
- Select English, Spanish, or French
- Run a quick system power test
- Choose your heat fuel source (gas, electric, oil, etc)
- Choose your heat delivery type (forced air, in-floor radiant, radiators)
- Connect to your Wi-Fi network
- Confirm home address for location-based features including Home and Away routines
- Choose device location
- Set up scheduled temperatures (Comfort, Eco, and Sleep are defaults)
- Create Home and Away routines
- Set up presence sensing (adjusts temperature based on device, like your phone, locations)

Once that is all done, you should be good to go. Google does note that it may take a few hours for the thermostat to adjust before functioning properly with regards to setting and maintaining proper temperatures.
Ease of Use
Once installed and set up, the Google Nest Thermostat is super simple to use. Swipe up and down on the right side to adjust the temperature. Tap the side to make a selection or bring up the menu. The menu also displays the current outdoor temperature, indoor temperature, and indoor humidity when first tapped.
Menu options include toggling the heat one and off, holding the current temperature, setting the fan to on, off or auto, and various other settings. These other settings include an equipment check, battery level check, Wi-Fi strength check, current version number, disconnecting your current Google account, restarting the thermostat, and factor resetting it.

If you need a quick video walkthrough, Google has a few available on their website that cover everything from installation to improve your energy savings.
Software
After installation, the Google Nest Thermostat is best controlled through the Google Home app. Open the app, then scroll down and tap the Nest Thermostat icon you want to control. The main screen shows the current temperature and what time it is set to change. You can easily adjust the current temperature by dragging around the circle shown or using the +/- buttons. This screen also displays the indoor temperature and humidity. Near the bottom are four buttons to quickly access and toggle heat, apply a preset, hold the current temperature, and toggle the fan.
You can access your Energy Dashboard in the upper right corner, which shows your daily, weekly, and monthly stats. You can also access your thermostat settings, get help, or send feedback. For thermostat settings, Google Home lets you adjust the following:
- Device Information
- Sharing
- Notifications
- Presence sensing (which devices are enabled to assist with this)
- Thermostat (units, click sound, wake display, etc)
- Temperature preferences (presets, safety temperatures)
- Schedules
- Energy Dashboard
- Remove device

Overall, it’s pretty straightforward and easy to use once you figure out where each setting is.
Performance
As far as performance is concerned, the Google Nest Thermostat works well once set up. It followed the preset schedules, tracked heat usage, and even suggested changes to save energy. Unfortunately, someone is always home, so it never really entered true savings mode. On that note, I did test the presence sensing using my phone, and shortly after I left the house, the thermostat did kick into Eco mode.
The thermostat was easy to control and adjust using the side touch panel or the app. Overall, we really had no issues with the thermostat and its performance.
Accessories
Depending on your existing setup, you may also want to get the Nest Thermostat Trim Kit, which will set you back another US$14.99. The trim plate covers holes you may have left behind from your previous thermostat, especially an older style one. The plate is just over 7-inches wide, 4.41-inches in height and just under 1/4-inch thick. It also comes with a steel plate that mounts to an existing electrical box (if you have one) before placing the trim plate and then the Google Nest Thermostat onto the trim plate, as mentioned above.

While it worked, personally, I wish there was also a round plate option as, in my case, the wider plate didn’t cover the previous mounting holes from my old pre-ecobee thermostat. On that note, the ecobee cover plate covered them with no problem due to its rounded shape.
Price/Value
With an MSRP of US$129.99/CA$179.99, the Google Nest Thermostat is really affordable. In fact, it’s a lot cheaper than some of the competition. Given how easy it is to install, use, program, and potential energy savings, it offers decent value as well. Depending on where you live, you may also be eligible for rebates from your local government, adding even more value.
Photo Gallery


Wrap-up
With a few minor design exceptions, the Google Nest Thermostat is a great smart thermostat that not only allows you to control the temperature in your home but it can also learn your habits, offer suggestions, and even adjust itself once you leave the house.
In some of our articles and especially in our reviews, you will find Amazon or other affiliate links. As Amazon Associates, we earn from qualifying purchases. Any other purchases you make through these links often result in a small amount being earned for the site and/or our writers. Techaeris often covers brand press releases. Doing this does not constitute an endorsement of any product or service by Techaeris. We provide the press release information for our audience to be informed and make their own decision on a purchase or not. Only our reviews are an endorsement or lack thereof. For more information, you can read our full disclaimer.