
We’re back with yet another EZVIZ review. We’ve already taken a look at the C3X Outdoor Smart Wi-Fi Camera and the DB1 Wi-Fi Video Doorbell. Next up is an outdoor camera with floodlights, great for placement on a garage or other spot on your house.
Our EZVIZ LC1C review takes a look at a smart security light camera with dual floodlights and a host of other features. Read on for the full review!
Specifications
The EZVIZ LC1C Smart Security Light Camera has the following features and specifications:
| Model | CS-LC1C-A0-1F2WPFRL |
| Processor | Embedded High-Performance SOC Processor |
| Operating System | Embedded Linux |
| Light Parameters | • Lamps: 2 • LED: SMD LED • Brightness: 2000LM (+/-10%) • CRI: 80 • Color Temperature: 3000K • Life-Spa: @B50L70 @Ta 25°C 25000H |
| Detection Distance | 10 meters (33 feet) |
| Detection Range | 270° |
| Camera | • Resolution: 1920 × 1080 • Field of View Horizontal angle: 103°; Vertical angle: 57°; Diagonal angle: 121° • Night Vision Up to 25 m (82 ft.) |
| Video | • Compression Standard: Smart H.264, H.265 • Max. Resolution: 1920 × 1080, Full-HD • Frame Rate: 25fps, Adaptive frame rate of network transmission • 3D DNR, WDR, BLC |
| Audio | Built-in omni-direction microphone, built-in loudspeaker, noise suppression |
| Network | Soft AP configuration, 802.11 b/g/n @2.4GHz only (2T2R, dual-antenna) |
| Storage | Supports microSD card (up to 256GB), EZVIZ Cloud Storage (in select countries) |
| Ingress Protection | IP65 on camera |
| Power | Hardwired (100v – 240v), ≤35W power consumption |
| Operating Conditions | -30°C to 50°C (-20°F to 120°F), 0-95% working humidity |
| Dimensions | 268 x 186 x 185 mm (10.55 x 7.32 x 7.28 inch) |
| Weight | 1469 g (3.24 lbs) |
What’s in the box
- EZVIZ LC1C Security Light Camera
- Wire connectors
- Mounting plate & screws
- Quick start guide

Design
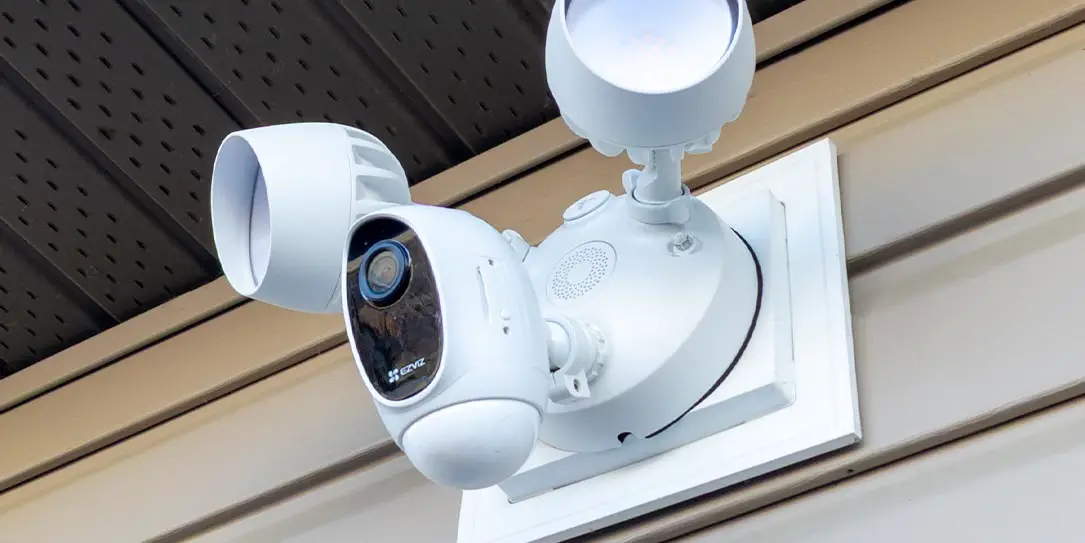
When it comes to floodlight cameras, the design is pretty universal. The EZVIZ LC1C Smart Security Light Camera is no exception. The entire unit is just over 7 1/4 inch high and wide and about 10 1/2-inches in depth.
The base is a round unit with two floodlights attached on either side of the top, the camera unit centered on the bottom, and the speaker in the middle. On either side of the speaker are two holes for the mounting screws. The security lights attach to the base via a light arm screw, that can be loosened to adjust for tilt, and a light base ring, that can be loosened for rotation.
The camera is also attached to the base by way of a camera arm and ball joint on a camera ring that can be loosened for rotating and angling the camera. On one side of the camera unit is a covered door for the microSD card slot and reset button. The bottom of the unit is where the passive infrared sensor (PIR) is located.

The EZVIZ LC1C also has an IP65 rating and works in temperatures between -30°C to 50°C (-20°F to 120°F), so it should be good for most areas.
Installation/Setup
Before you install the EZVIZ LC1C camera, there are a few steps you should take first, namely making sure the Wi-Fi strength where you want to install the floodlight camera is strong enough. Once you’ve confirmed that, you can proceed to the actual physical installation of the camera.
As I already had a floodlight camera installed, I was in good shape. It took about 45m to remove my old floodlight camera and install this one.
All you really have to remember is to turn off the breaker associated with the fixture your replacing, and to match colours. It really is that easy. Swann provides everything you need if you’re going this route, including grommets, screws, and a mounting bracket.
Once you’ve killed the power and removed the old light fixture, attach the new mounting plate to where you want it installed. Next, connect the wires: white to white, copper to your ground (or other green wire), and black to black. Once you’ve done that, screw the camera unit onto the mounting bracket using the included bolt, and finish off by capping it. Once in place, you can then adjust the floodlights and camera by loosening the locking nuts, locking collar, and adjustment knobs as required.

Once you’re set up, turn the breaker back on and proceed to the software section for details on how to install and pair the system to the EZVIZ app on your smartphone. For that part of the setup, scan the QR code on the camera or Quick Start Guide. The app walks you through the rest of the steps like connecting to your 2.4GHz W-Fi network (sorry, no 5GHz support), and setting you your options like formatting your memory card (if installed), changing your resolution, and more.
Ease of Use
Once installed, set up, and configured properly the EZVIZ LC1C is pretty much good to go. When it detects motion, you’ll get an alert which, when clicked on, displays a static image and then you can go in and watch the video playback. You can also easily access live view and enable the two-way audio if you want to converse with whoever is triggering the motion.
Software
Android App
Being the same app used for the C3X, this will be familiar if you read that review. As mentioned above, you’ll need to install the EZVIZ app to install and use the EZVIZ DB1 Wi-Fi Video Doorbell. The home screen of the app gives you an image overview of all the EZVIZ cameras you may have installed. This includes a still of the time when you open the app. From here you can click on the image to open the live view or check the cloud or local video history.
When viewing previous video clips, the app displays a timeline with yellow blocks where it has recorded motion. These blocks will be different widths because the camera records for the duration of the activity, not just for a preset time which is a great feature, to be honest.
Click on the person icon below the image still on the home screen takes you to the Alarm Notification settings. This lets you toggle PIR alarm notifications, set a notification schedule, select an audio mode (silent, soft warning, intense warning tone), and set the alarm area. The alarm area can be set to 1.5, 3, or 5 meters (5, 9, or 16 feet).

Clicking on the settings cog will open the settings tab for the camera. These include toggling answer doorbell call, outdoor bell sound, audio, status light, IR light, time and date settings, Wi-Fi configuration, cloud storage, storage status, device updates, image encryption, and offline notification, as well as viewing the user guide and about settings.
The second screen is your notification messages screen. Clicking on that will bring up all your previous notification alerts and provides easy access to each event. You can also filter by date, message type, and device, and edit the messages so you can delete specific notifications or even mark all as read.
The third, and last screen in the app, lets you check your saved clips, manager device setting, account security, check your CloudPlay subscriptions, set up IFTTT, provide feedback, and manage third party accounts.
EZVIZ Studio
To be honest, I didn’t know there was an EZVIZ Studio desktop app until I had issues with the image settings on the DB1. It is handy though as it allows you to access and further configure your cameras. The main page lets you view all your cameras in a grid format. You can also access your notifications, local albums, change access control, and access your account settings.
The real value in installing the desktop app is being able to access advanced settings for each of your cameras. As mentioned below in the Camera section, you’ll need to modify a configuration file to access the advanced settings. Once done, you can access System, Network, Storage, Event, ATM, Advanced, CCD, and Image configuration settings. You’ll likely not want to tinker with many of these but the Image settings section will be useful as you’ll see below.

Performance
Performance. That’s always key to any device. Initially, I was pretty disappointed with the EZVIZ LC1C’s performance. While both the DB1 video doorbell and C3X camera had great performance out of the box, the LC1C wouldn’t stop triggering regardless of the settings I had it on. Like the DB1, it features distance detection as opposed to a select selection area like the C3X. In this case, however, there are two setting sections: light linkage and motion sensitivity. The light linkage settings allow for 3, 7, or 10 meters (10, 23, or 33 feet). The motion sensitivity slider goes from 0 to 6. When set to 0, motion detection is off, 1 is the lowest, and 6 is the highest sensitivity setting.
For the initial setup, I set the light linkage for 10 feet with a sensitivity of 3 (the default). As mentioned, the PIR events went off constantly. Once it got darker, this included the floodlights triggering as well. Even with the motion sensitivity to 1, I was still getting frequent triggers of both the light with the PIR event notifications still frequent, but not as frequent as before.

The next day I adjusted the camera to point down, only covering light as after watching the footage, the camera was triggering on vehicles driving past my house. After adjusting the camera so that it just covered to the end of the driveway, I reset the motion sensitivity to 3. After that, detection seemed normal. I also noticed that sometimes the light would trigger without the motion triggering and that’s when I realized that the two actually work independently of each other. The lights do trigger when it detects movement within the distance you set it to. On the other hand, the PIR event and recording will only start when it meets the sensitivity parameter. While this is good, it can also be a bit of a pain to find the right balance.
Overall, though, once I physically adjust the camera to avoid it recording events I didn’t care about, the camera did perform decently for the most part. Recordings on the microSD card did seem to take a bit longer to load, but it is also further from my router than the other two EZVIZ devices I have installed.
Camera
Having a resolution of 1080p, the camera on the LC1C Smart Security Light Camera is pretty decent. When set to the highest quality, it is crisp and clear during the day, with night vision, and at night with the floodlights on. I definitely didn’t have any concern with the image quality. As mentioned in the Software section above, if you do have issues with the brightness or contrast, you can adjust those after making some modifications to a system file with the EZVIZ Studio desktop app.

Sound Quality
The EZVIZ LC1C is also equipped with two-way audio. When the speaker is enabled, the audio comes through nice and clear when speaking into the app via your smartphone.
Microphone Quality
On the other hand, it was a bit hard to hear the other party through the app. With my phone volume turned to maximum, the audio coming back was almost normal levels but I had to really focus to hear them. I do suspect part of the issue is the distance the other person is standing from the camera. Given it’s mounted about 10 feet up, an individual is unlikely to be standing directly under it, only adding to the distance the sound has to travel to the microphone.
Price/Value
The EZVIZ LC1C has an MSRP of US$149.99. Sensitivity issues aside, it is a pretty decent camera and the price falls in line with other similar devices. Better yet, however, the camera is currently selling for just over $100 on Amazon which makes it a pretty good deal.

Wrap-up
Once it’s set up properly to compensate for its oversensitivity, the EZVIZ LC1C Smart Security Light Camera offers solid video surveillance and motion detection.
In some of our articles and especially in our reviews, you will find Amazon or other affiliate links. As Amazon Associates, we earn from qualifying purchases. Any other purchases you make through these links often result in a small amount being earned for the site and/or our writers. Techaeris often covers brand press releases. Doing this does not constitute an endorsement of any product or service by Techaeris. We provide the press release information for our audience to be informed and make their own decision on a purchase or not. Only our reviews are an endorsement or lack thereof. For more information, you can read our full disclaimer.
Last Updated on February 3, 2021.