The one downfall of the latest generation of gaming consoles is their limited internal hard drive size. Both the Xbox Series X|S and PlayStation come with a 1TB internal SSD. However, after you take the operating system into account, you’re left with much less — 667.2GB on the PS5, for example. While the Xbox Series X|S has a proprietary expansion drive, the PS5 has an M.2 SSD expansion slot located inside it. Here’s how to easily install an extra M.2 SSD inside your PlayStation 5 console for more storage (and minor performance gains). Late to the game, I know, but we just managed to get our hands on a PlayStation 5 so here we go!
Estimated reading time: 3 minutes
Before you start, you’ll need to purchase a compatible drive, preferably with a heatsink attached to it. Sony requires that the drive be PCIe Gen4 and have read speeds of at least 5,500MB/s (which is what the internal SSD on the PS5 is). For our upgrade, we used the Seagate FireCuda 530 with Heatsink. With read speeds of up to 6,500MB/s, you’ll also see a minor decrease in load times for games.
Let’s dive in and see how easy it is to add extra storage to your PlayStation 5 console.
- After making sure your PlayStation 5 is up to date, disconnect all cables and move it to a clean workspace.
- With the console upside down (the PS logo facedown), grip the bottom-right and top-left corners of the bottom cover, gently lift the right side and slide the cover off to the left.
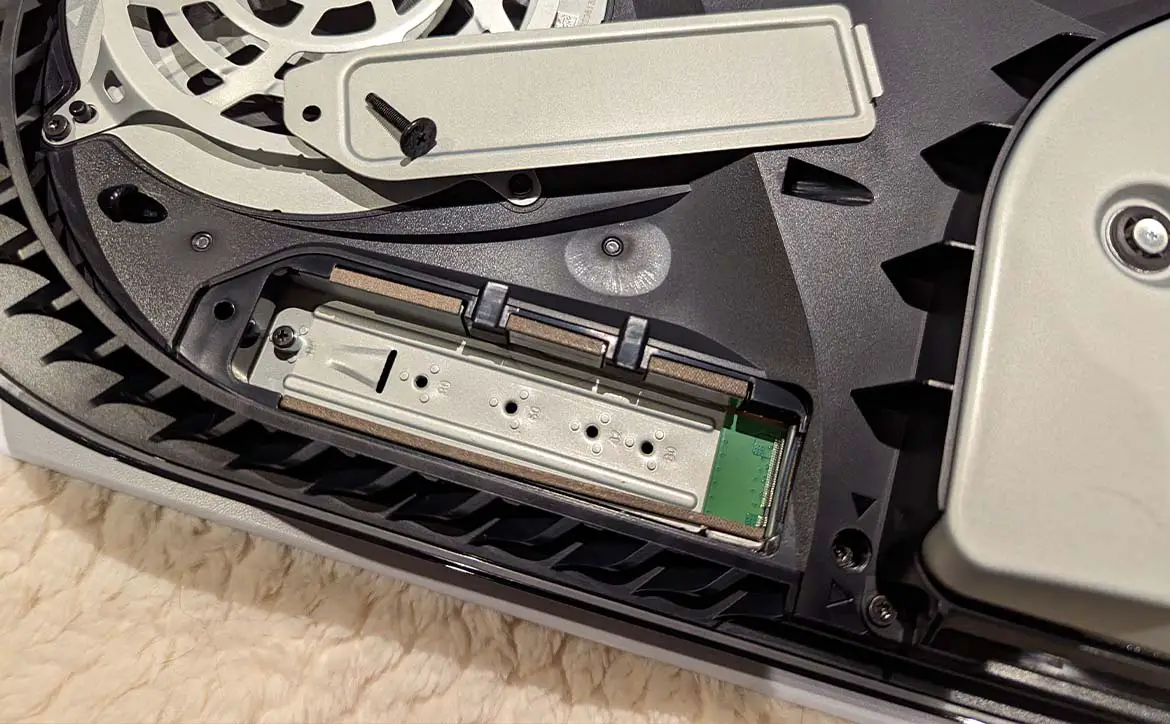
- Once the cover is removed, remove the screw from the expansion slot cover.
- Next, remove the spacer screw and move the spacer to the groove marked “80.”
- Insert the Seagate FireCuda 530 (or other compatible M.2 SSD) with the heatsink facing up and the notch resting on the spacer. As it is compatible with the PlayStation 5, the FireCuda 530 with the heatsink fits perfectly inside the SSD expansion slot in the console.
- Once installed, insert the spacer screw through the spacer and tighten it back in place.
- Next, reattach the expansion slot cover and fasten it into place.
- Finally, place the bottom cover back on your PlayStation 5 by placing it slightly to the left, then slide it back towards the right until you hear a click.
- Plug your console back in, turn it on, and you will receive a prompt to format your M.2 SSD storage, accept it and you’re good to go.
- Once formatted, you can go into your PlayStation 5 settings and move existing game installations and/or set the default installation location to your newly installed and formatted FireCuda 530 SSD.


That’s it, you’ve now added more storage space and hopefully gained a slight performance gain in ten easy steps. To give you an idea of the performance gains you can expect, check out our Seagate FireCuda 530 with Heatsink review.
Have you installed an extra SSD in your PlayStation 5 console? If you haven’t, will you now that you can see how easy it is? Let us know on social media by using the buttons below.