
Over the past couple of years, we reviewed the MOUNTAIN Everest Max and MOUNTAIN Everest 60 modular keyboards. Honestly, they’re some of the best keyboards I’ve tried and reviewed, for various reasons. One of the biggest is the ability to attach or detach elements of the keyboards to expand functionality or reduce size when you don’t need functionality like a number pad. Late last year, the company announced two new peripherals for its modular keyboards: keypads.
Estimated reading time: 11 minutes
Our MOUNTAIN keypad review looks at a pair of keyboard attachments for Everest keyboards that offer additional functionality and can also be used as a standalone peripheral. Read on for our full review and find out why the DisplayPad earned an Editor’s Choice Award here at Techaeris.
Table of contents
Specifications
DisplayPad
The MOUNTAIN DisplayPad keypad we reviewed has the following features and specifications:
| Color | Midnight Black |
| Display Keys | 12x 104x104px |
| Image Formats | Animated GIF, JPG, PNG, BMP |
| MCU | Cortex M0 |
| Interface | USB 2.0 |
| Dimensions | 5.78 x 3.15 x 2.64″ (14.7 x 8 x 6.7cm) |
| Materials | Aluminum plate, ABS bottom cover, rubber pad |
| Number of Profiles | ∞ |
| Display | 4.5″ 800x240px IPS |
| Polling Rate | 1000Hz/1ms |
| Connector | USB Type-C |
| Cable Length | 2m |
| Weight | 127g (538g incl. stand) |
| Software Support | Base Camp™ (Windows only) |

MacroPad
The MOUNTAIN MacroPad keypad we reviewed has the following features and specifications:
| Color | Midnight Black |
| Switches | MOUNTAIN Tactile 55 |
| Image Formats | ABS |
| MCU | Cortex M0 |
| Interface | USB 2.0 |
| Dimensions | 5.78 x 3.15 x 2.76″ (14.7 x 8 x 7cm) |
| Materials | Aluminum plate, ABS keycaps & cover, rubber pad |
| Number of Profiles | 5 |
| Switch support | 3-pin & 5-pin Cherry MX-style |
| Polling Rate | 1000Hz/1ms |
| Connector | USB Type-C |
| Cable Length | 2m |
| Weight | 118g (531g incl. stand) |
| Software Support | Base Camp™ (Windows only) |
What’s in the box
- MOUNTAIN DisplayPad or MacroPad keypad
- Stand w/ Rubber Pad
- 2m USB Type-C to USB Type-A Cable
- Keycap/Switch removal tool (MacroPad only)
- Quick Start Guide
- MOUNTAIN stickers
Design
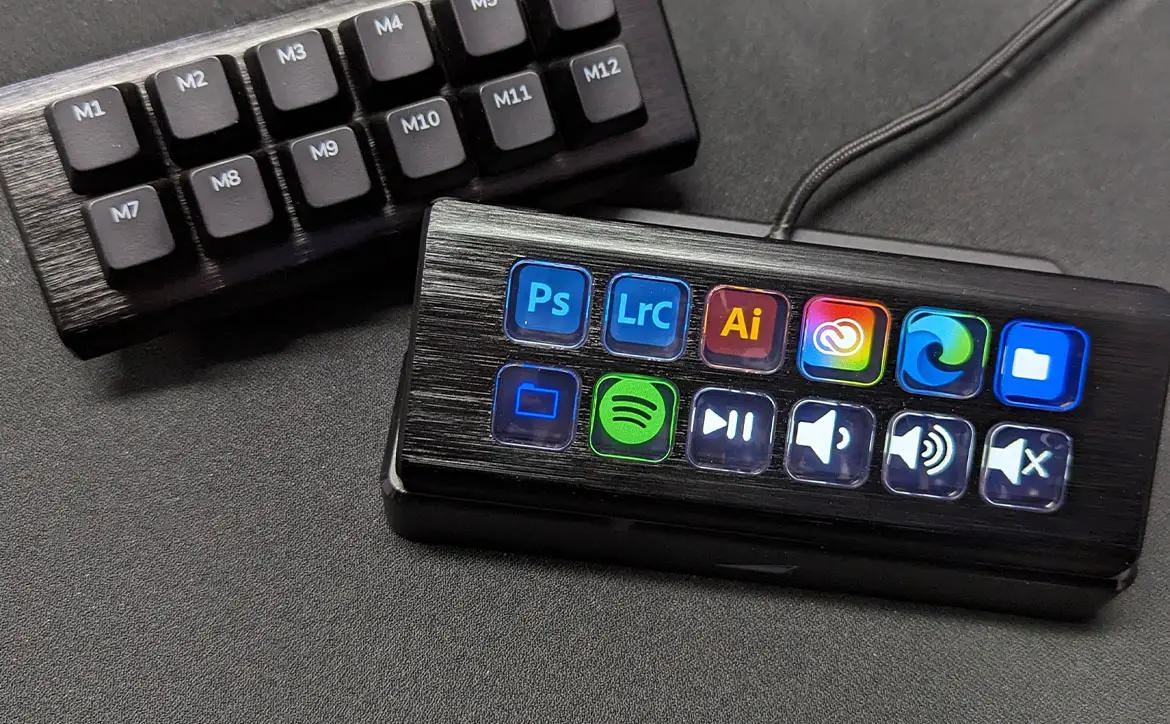
The main portion of the MOUNTAIN keypads is pretty similar in design. Both feature a black block roughly 5 1/2″ wide, 1 3/4″ deep, and about 2″ high. The brushed aluminum top cover where the display buttons or keys are located is ergonomically angled. In the case of the DisplayPad, there are two rows of 6 buttons each, 5/8″ square with rounded corners and a gloss finish. It would be nice if these weren’t as glossy as the corners do tend to catch the light and reflect depending on your setup.

For the MacroPad, there are two rows of full-sized ABS keys labelled M1 through M12. These keycaps are easily removable, exposing the MOUNTAIN Tactile 55 switches. The switches are hot-swappable with 3- and 5-pin Cherry MX-style switches, and are factory-lubed. The keys themselves are solid and have that nice clicky feeling (and sound). In addition, the MacroPad has RGB backlighting to match your setup.
Underneath the angled panel is a slot that either slides onto your Everest Core or Max keyboard, or the included stand. On the back edge is a single recessed USB-C port along with the MOUNTAIN logo printed in grey above it. Even though the keypads fit nicely on the MOUNTAIN Everest Max and Core keyboards, unlike the numpad and media dock that have a built-in USB-C connector, these don’t and unfortunately they both take up an extra USB-A port on your computer and your laptop. However, this does mean they can be used as standalone peripherals as well.
The base itself is quite a bit more substantial and is heavy. Just under 6″ wide, it’s just under 3 1/4″ in depth and 7/8″ in height at the front. Covered in the same ABS plastic as the keypads, the front has the MOUNTAIN logo printed on it. The front edge is about an inch deep, and the dock slides nicely into it for a nice secure, solid fit. As I mentioned, the base is pretty heavy and coupled with the blue rubber pad on the bottom of it, it doesn’t slide around on your mouse mat or desk. In addition, the longer back edge means it doesn’t tip backwards when you’re pressing a display button or key. When the base is combined with the DisplayPad or MacroPad, the entire assembly sits between 2.64 and 2.76″ in height.
The keypads are constructed from ABS plastic but do feel pretty solid and due to the aluminum top plate with a brushed finish on the top edge, look pretty decent sitting on your desk amongst your existing setup. The braided USB-C to USB-A cable is a nice touch as well, and I am a big fan of braided over coated cables simply for how much nicer they look in areas they are visible.

As far as durability, I’ve been using the DisplayPad daily for about 3 months and they are showing no signs of wearing or lack of responsiveness when pressed.
Installation
Installing the MOUNTAIN keypads is dead simple. All you have to do is slide it onto the top edge of your MOUNTAIN Everest keyboard or into the included dock, plug the USB-C end of the included cable into the DisplayPad or MacroPad, and the other end into a free USB-A port on your computer. Next, you’ll need to install the MOUNTAIN Base Camp software in order to configure the display keys or macro keys on the corresponding keypads.
Software
When initially plugged in, the upper left tile on the DisplayPad displays the MOUNTAIN logo. Pressing this when you have a browser open will take you to the MOUNTAIN website and get you started. From here, select Keypads, then select DisplayPad, and finally the link that says “Set up DisplayPad with Base Camp™.” Once on the next page, click the tile to download the company’s Base Camp software. With the MacroPad, you’ll have to go to the website and download Base Camp directly.
Once installed, you can use the software to create profiles, bind keys, create macros, and adjust settings. Some of the key bindings you can assign include OS Commands, launching your browser, running a program, opening a folder, running a macro, media controls, keyboard shortcuts, mouse function, swap profiles, launching the clock, viewing PC info, or even creating a folder for even more “levels” of key bindings. More on that in the “Ease of Use” section.

As far as profiles are concerned, the MacroPad only has 5 versus the infinite number on the DisplayPad, which is another reason I’d highly recommend the DisplayPad over the MacroPad.
Ease of Use
Assigning functions to each key is pretty straightforward, but it’s not all super easy. If you want to create key bindings to launch a specific app, you need to browse to find the apps through File Explorer. It would be nice if there was a way for the software to return a list of installed apps. I found the easiest way to do this was to search for the app using the Windows 11 start menu, right-click on the icon, choose “Open file location…,” then select the path (most I found were in C:\ProgramData\Microsoft\Windows\Start Menu\Programs) and paste it into the Base Camp file search window. Depending on the install location though, some games, for example, were almost impossible to find due to them being installed in hidden directories.
Once you’ve assigned an app or function to a button, you can set an icon on the DisplayPad. This visual cue is a lifesaver, especially when you have multiple key bindings set. With the Macropad, you’ll have to rely on your memory to remember which key bindings you have set. MOUNTAIN provides quite a few preset icons for popular applications and functions, but it’s super easy to create your own. Simply create a 140 x 145px png, jpg, or gif icon. You’ll likely want a small border around the edges due to the rounded corners on the buttons. Once created and saved, you can upload it to the DisplayPad through the Base Camp software app. If you have a folder system set up on the DisplayPad, tapping that button while the key binding tab is open will change to that level in the app and you can continue binding keys and assigning icons.
After you’ve configured your DisplayPad or MacroPad, it’s super easy to use. Simply tap the button or key you want and whatever action you assigned to it will be performed.
One thing I will note here though. While the keypads do support multiple profiles, there is no onboard storage for use between different computers. This partly makes sense, however, as different computers may have different install locations for applications or other features. That being said, it would be nice to have in case you wanted to use a single DisplayPad between a computer and a laptop. At the end of the day, though, you can export your profiles and import them on another computer, make a few computer-specific changes and save them that way. While time-consuming at first, once set up, you can then easily use the keypad between different computers if you had a need for that.

Display
This section only applies to the MOUNTAIN DisplayPad keypad, as it has an array of 12 buttons on it with a tiny screen. As mentioned above, they are 5/8″ square clear covers with rounded corners. Underneath is a 104px by 104px display, much like the one on the Everest numpad. The displays themselves are pretty crisp and clear, and the brightness can be adjusted between five settings: 0, 25, 50, 75, and 100%. For the most part, I set it to 50% and left it and it’s been fine for day-to-day (and evening) use.
Performance
As mentioned above, once you’ve configured your MOUNTAIN keypad, it’s pretty easy to use. I had no issues with an app launching, macro running, or media controls responding as configured and expected.
You can also set up profiles to display different shortcuts when you launch a certain app. For example, I had it set up to display common Adobe Photoshop shortcuts I use whenever I launched Photoshop. It worked great when launching the app, but the DisplayPad doesn’t revert to back to the default layout until you close that app. Even tabbing out or minimizing Photoshop to the desktop continued to display that program’s tile set. While that is understandable, there were times when I’d need to minimize Photoshop to do other things that I could have benefited from the extra key bindings on the default setup.
One minor quirk I found was that I did have to launch the Base Camp app occasionally, but not all the time, in order for the sleep mode to take effect on the DisplayPad after waking my computer from sleep mode or restarting it.
Price/Value
The MOUNTAIN DisplayPad retails for $109.99 while the MacroPad retails for a much more affordable $59.99 on the MOUNTAIN.gg website. If you can afford it, I’d definitely recommend the DisplayPad over the MacroPad for its added functionality — even if just for the customizable buttons for easier visual recognition of button mappings.
Photo Gallery


Wrap-up
Keypads aren’t new but are more popular in gaming circles for game streaming. However, both the MOUNTAIN DisplayPad and MacroPad keyboard peripherals are great additions to the Everest lineup for gaming and productivity purposes. Given the fact they can be used with any keyboard in a standalone format, they are great additions to any work or gaming setup. While similar in functionality, the DisplayPad simply takes the cake with its customizable buttons and, as a result, walks away with one of our first Editor’s Choice Awards for 2023.
In some of our articles and especially in our reviews, you will find Amazon or other affiliate links. As Amazon Associates, we earn from qualifying purchases. Any other purchases you make through these links often result in a small amount being earned for the site and/or our writers. Techaeris often covers brand press releases. Doing this does not constitute an endorsement of any product or service by Techaeris. We provide the press release information for our audience to be informed and make their own decision on a purchase or not. Only our reviews are an endorsement or lack thereof. For more information, you can read our full disclaimer.
Last Updated on March 13, 2024.