**Please see the notice under Preparing the Drives and Transfering Data before attempting this upgrade. Techaeris is not responsible for any damage or problems that may arise from attempting this upgrade. This guide is provided solely as educational and informative. Attempt at your own risk.
Now that I’ve taken the plunge into a 2015 MacBook Pro Retina instead of the more costly 2016 MacBook Pro, it’s time to upgrade it. The 2TB OWC Aura Pro X2 SSD upgrade kit is the perfect solution for this. OWC also makes these kits in smaller capacities for a lower price so don’t think you need to purchase the 2TB version. OWC did send this one out to us for this project so thanks to them for supplying the drive.
There are really only two things you can do to improve the 2015 MacBook Pro Retina, upgrade the SSD and reapply your CPU/GPU thermal paste. This article is going to focus on the 2TB OWC Aura Pro X2 upgrade kit and I will have a separate article on reapplying your CPU/GPU thermal paste. Upgrading the SSD on this MacBook Pro is fairly simple and I would give it a moderate rating for difficulty.
The 2015 MacBook Pro Retina
This laptop isn’t too difficult to get open but you will need some pentalobe screwdrivers, which OWC does supply in the upgrade kit. You will also need an anti-static bracelet, something to hold your screws in, and a flat clean surface to work on.
Start by flipping the 2015 MacBook Pro Retina over on its top. There are ten P5 screws located along the bottom left, right, top, and bottom. You can remove these in any order you wish. Even though these all look the same, I like to remember where each came from and return them where they were. Once you have the screw out, you can gently pry up on the back cover. Be gentle as sometimes there is a small clip in the center holding the cover on.
Once you have the cover off you should prepare yourself for the SSD replacement.

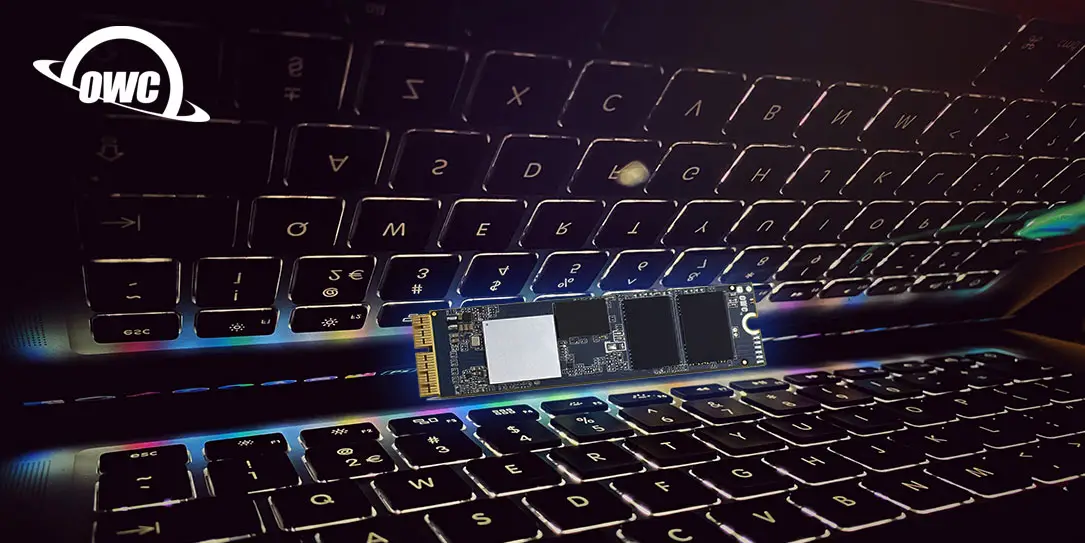
Installing the 2TB OWC Aura Pro X2 SSD Upgrade
First thing’s first: disconnect the battery cable. You should always do this before you work inside of your laptop, for your safety and to avoid any damage to the laptop. At this point, you can feel free to clean up the inside of the laptop. I skipped this because I will be reapplying thermal paste in a few days and I will clean up when I go through that process.
Take care when disconnecting the battery, don’t use a screwdriver or anything sharp. You can use a plastic spudger or your fingernail to gently pry it up and it will disconnect. There may be a piece of black plastic tape covering the terminal, just gently move that up but don’t take it off.
Once you have the battery disconnected and have cleaned up anything inside that needs it, you’re ready to install the 2TB OWC Aura Pro X2 SSD in your 2015 MacBook Pro Retina.

Using the T5 Torx screwdriver supplied by OWC, remove the one T5 screw holding the stock SSD in place, don’t lose that screw! Gently grasp the SSD by its sides and, with ease, pull it straight out of its socket. It should come out fairly easily.
Unpack the Aura SSD and find the notch on the connector. Make sure that notch lines up to the notch on your logic board. Gently slide the drive into the socket. Of note, others have mentioned this and I will as well: the 2TB OWC Aura Pro X2 SSD has a little more resistance when installing so you will need to push a little harder.
Reinstall your SSD screw, reconnect the battery, and move on to installing the software. Note, I do not put the screws back on the back of the 2015 MacBook Pro Retina. I will replace them all once I have everything working but you can do what you like. I do put the back cover back on, but without screws, just so I am not sitting the laptop on its logic board.

Preparing the Drives and Transfering Data
Now, there are several ways to do this and I am only showing you the way I choose to go about it. Even so, you should take note of this important notice from OWC about installing this 2TB SSD in your 2015 MacBook Pro Retina:
**macOS 10.13 High Sierra (or later macOS) must be installed on the host computer before installing the 2TB OWC Aura Pro X2 SSD. These OS versions include an EFI firmware update for your Mac. Without the update, the host computer will not recognize the 2TB OWC Aura Pro X2 SSD. When installing macOS to your new SSD, boot and press Cmd-Opt-R, then follow the prompts. This will ensure the latest compatible OS version is installed.
OWC
Inside your upgrade kit is an aluminum enclosure. OWC has this very clearly marked as being for use with the Apple Factory SSD only so don’t put your OWC drive in this. Take the stock SSD you removed and install it into this enclosure. Super simple, just slide it into the socket, use the supplied screw to hold it down, slide the cover on and secure with the supplied screws. Once you transfer the files and applications from this drive you can erase it at a later date and have a handy external drive you can take with you.

Use the supplied USB 3.0 cable to connect the enclosure to your 2015 MacBook Pro Retina. Press Cmd-Opt-R while you power the laptop on and keep those keys held down until you see the Apple logo. Once you boot into recovery, simply find the menu that prompts you to install a fresh version of macOS. Go through the install procedure of installing macOS Catalina.
macOS will take a while to install on the 2TB OWC Aura Pro X2 SSD (10-15m in my case) so you can probably leave your 2015 MacBook Pro Retina to stew for a bit. When you come back you will be asked to set up the laptop and you will get an option to transfer files from backup. Choose, “From a Mac, Time Machine, or startup disk.”
The system will scan for drives on your network as well as drives connected to your Mac. It will eventually find the drive connected and in our case, it was named Macintosh HD. Choose this drive, it will ask for the password, which is the password you had on your laptop before. You can then select the data you want to transfer. In my case, I picked everything because I wanted it all back on the new drive.
You’ll then set a new password for the 2TB OWC Aura Pro X2 SSD, which will be the password you’ll use to unlock the 2015 MacBook Pro Retina. The migration will initiate and you’ll just have to wait. Transfer times may vary depending on the data you have to move. Once it’s done, you’ll get a migration complete notification and then you’ll go through the rest of Mac setup.


When you log in, your desktop will look just as it did with the old SSD. You are now done.
Speed and Performance Increases
When we first purchased the 2015 MacBook Pro Retina (used for under $1,000), we were getting read/write speeds of just over 1,400 MB/s. Back in 2015 these speeds were pretty good but in 2020, we’re looking for just a bit better than that.
With the 2TB OWC Aura Pro X2 SSD installed, we are now seeing read/write speeds of up to 2,500MB/s. That’s nearly double the speed of the stock SSD and is going to give us much better performance. Your results may vary but I am very pleased with this upgrade and it’s not very hard to do.

From my perspective, the OWC Aura Pro X2 SSD is the best upgrade you can make to your older MacBook Pro. I highly recommend it.
As a reminder, if you choose to attempt this upgrade, it is entirely your responsibility. If you jack up your Mac then be prepared to be sad. That being said, if you take your time and follow these steps, you should be o.k. Best of luck and we hope you’ve enjoyed this article.
Is upgrading your SSD in your 2015 MacBook Pro Retina appealing to you? Will you be buying the 2TB OWC Aura Pro X2 SSD? Let us know in the comments below or on Twitter, or Facebook. You can also comment on our MeWe page by joining the MeWe social network.
In some of our articles and especially in our reviews, you will find Amazon or other affiliate links. As Amazon Associates, we earn from qualifying purchases. Any other purchases you make through these links often result in a small amount being earned for the site and/or our writers. Techaeris often covers brand press releases. Doing this does not constitute an endorsement of any product or service by Techaeris. We provide the press release information for our audience to be informed and make their own decision on a purchase or not. Only our reviews are an endorsement or lack thereof. For more information, you can read our full disclaimer.
Last Updated on February 3, 2021.